The content in this guide is currently being revised to align with the new user interface. Some text and images may be outdated.
User Permissions
Accelo has highly customizable permissions allowing your staff to have as much or as little visibility and module access as desired. All of the permissions for a particular user are broken down into a few different areas of Accelo. Listed from higher to lower level permissions these are User Licenses, Financial Visibility, User Groups, Individual Users, and Individual Object permissions. This guide describes these different levels of permissions as well as how to set them up. Also included is a section on Contributor permissions.
Also, click one of the links below to learn more about:
- User Group and Individual User Permissions
- Individual Object Permissions
- Contributor Type Permissions
User License Permissions
Each user license comes with a general set of higher level permissions. User licenses can be changed by Editing the user account under Settings > Users & Groups > Users > Edit.
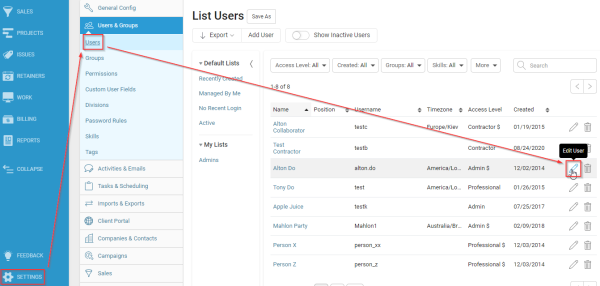
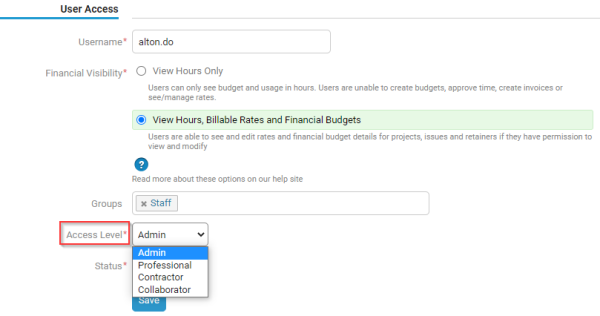
There are three Access Levels:
The Administrator license gives full, unrestricted access to all areas of Accelo. There are a handful of features that are only available to the user’s with an Administrator license. These include:
-
Profitability Dashboard
-
Staff Cost Rates
-
Timesheets for all Staff
-
Most CSV Imports
-
Costs and Profit section on Project Insights Tab
-
Full SQL Export
- Editing Shared Filters
The Professional license gives the user the ability to view, edit, and create work, as well as log time, across Accelo. They can be given all of the same permissions as the Administrator, except for the items listed above. This is the most common User License type.
The Contractor license limits a user’s permissions so they cannot see anything that hasn’t been assigned to them. When a task is assigned or managed by a user (including re-assignment), the system will automatically grant that user View permission for the parent object. Contractors cannot:
-
Manage Customers/Companies
-
Use scheduling tools
-
Manage work
Note: The Contractor Licenses are available on Premium Plans only.
To see more details on User Licenses, visit our in-depth Help Guide.
Financial Visibility
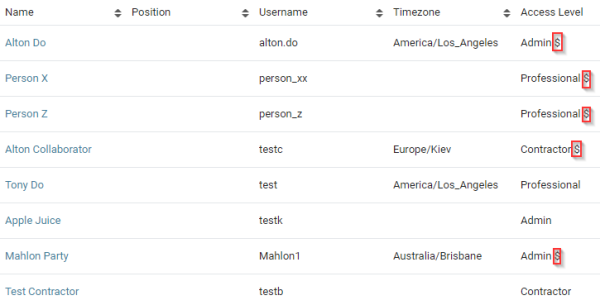
Financial Visibility is another high level permission setting that can be changed by Editing the user account under Settings > Users & Groups > Users > Edit. Users that have Financial Visibility enabled will show a “$” sign next to their User License type on the User List.
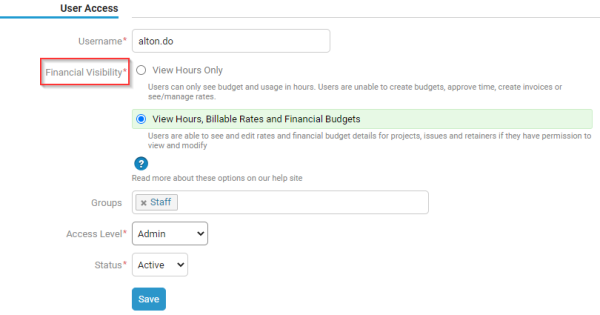
When editing a User, there are two options for Financial Visibility. The option View Hours, Billable Rates and Financial Budgets means that Financial Visibility is enabled. It allows users to see and edit rates and financial budget details for projects, tickets, and retainers if they have permission to view and modify the objects.
The View Hours Only option means Financial Visibility is turned off and users can only see budgets and usage in hours. Users are unable to create budgets, approve time, create invoices or see/manage rates.
The View Hours Only option limits users access to the various objects in Accelo in the following ways:
Sales
- Add Quotes are disabled.
- Current values and pipeline are hidden (only hours are shown)
- Add/Edit of budget and rate are hidden
- Financial details are excluded from Sales exports
- Sales Dashboard
Projects
-
Financial budgets and usage are replaced by hourly budgets and usage
-
Add/Edit Project Plan options are disabled.
-
Custom fields of Type = currency are hidden.
-
Approval and Invoice features are hidden.
-
Milestones only show hours.
-
Financial details are excluded from sales and project exports
Tickets
-
Current rate and financial budget are hidden (only hours are shown)
-
Add/Edit of budget and rate are hidden
-
Approval and invoicing options are hidden
-
Custom fields of Type = currency are hidden.
-
Financial details are excluded from issue exports
Retainers
-
Add/Edit of Retainers and periods are hidden.
-
Current rate and financial budget are hidden (only hours are shown)
-
Add/Edit of budget and rate are hidden
-
Approval and invoicing options are hidden
-
Custom fields of Type = currency are hidden.
-
Financial details are excluded from Retainer exports
Activities
-
Any billable rates ties to an Activity/Work Entry will be hidden (including their own).
Progressions
-
Any progression actions related to editing rates, budgets, approving time or invoicing will be either automatically skipped, or the user will be informed that they must skip this step as they do not have the permissions to see it.
Administration
-
Since there are already permissions controls in place for accessing the administration area, we have not added many extra restrictions. However, as a precaution:
-
Users will be unable to view/access the rates configuration.
-
Users will be unable to view the billable rate or cost rates for any user (including themselves) from the user profile view/edit screens.
-
For more info on Financial Visibility, visit our detailed Help Guide.
User Group Permissions
You can set up User Groups in Accelo to allow you to easily categorize staff and assign bulk access and control permissions. This allows fast and powerful control over your staff's access to the modules in Accelo.
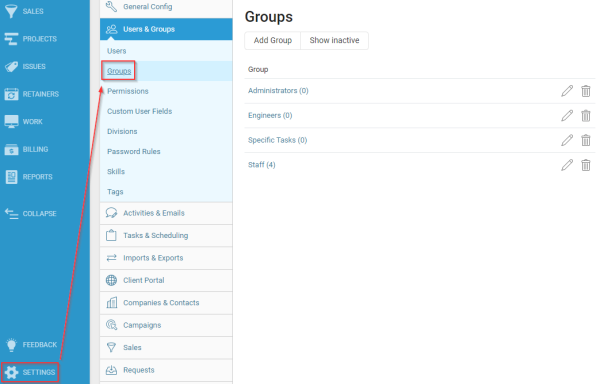
Groups can be accessed by going to Settings > Users & Groups > Groups. Users can be added to a group directly from this page, or on the Groups tab of a particular user’s account page.
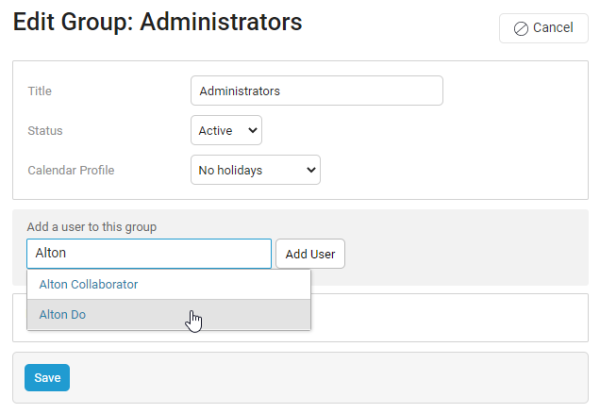
Once users are assigned to groups, specific permissions for these groups can be set. One good practice is to use these groups to give some or all staff a basic set of permissions. Additional permissions can then be assigned out on-top of these basic permissions either through individual user permissions or by adding users to additional groups with extra permissions. Permissions in Accelo are accumulative, so if a user is assigned to multiple groups with various permissions, they will inherit all of permissions that are enabled from every group.
To update the Group permissions go to Configuration > Users & Groups > Permissions. The dropdown at the top of this page lists the names of each staff member, followed by the user groups, and then the contributor type permissions at the end of the list. Pick the desired user group from the drop down list to update that group’s permissions.
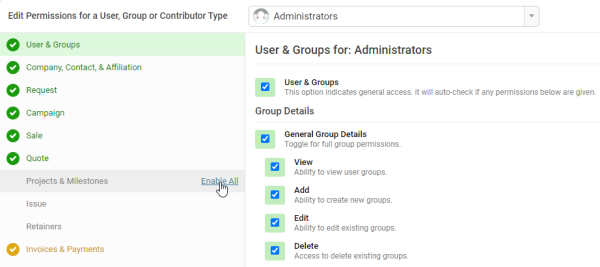
The column on the left shows the various permissions menus, broken up into categories representing the object type or module. Next to the title of each menu there is an ‘Enable All’ or ‘Disable All’ button to quickly toggle on or off all permissions for that object/module. Clicking into the menu will bring up a checklist of all of the available permissions for that object or module.
To enable a permission simply add a check to the checkbox, or to remove a permission uncheck it. The permissions for the ability to Add, Edit, or View All objects will be shared across every category that is defined on the left-hand side. Each menu has additional permission options for specific tools available to that object/module as well as configuration and administrator permission options. All available permissions options are listed in the User Group and Individual User Permission Options section below.
Individual User Permissions
Permissions for individual users can be found in the same area as the User Group permissions. Go to Settings > Users & Groups > Permissions. The dropdown at the top of this page lists the names of each staff member, followed by the groups, and then the contributor type permissions at the end of the list. Pick the desired staff member from the drop down list to update their individual user permissions.
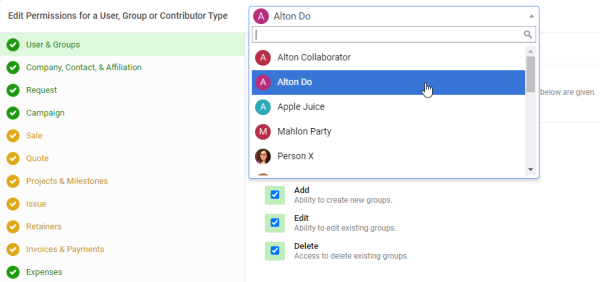
The column on the left shows the various permissions menus, broken up into categories representing the object type or module. Next to the title of each menu there is an Enable All or Disable All button to quickly toggle on or off all permissions for that object/module. Clicking into the menu will bring up a checklist of all of the available permissions for that object or module.
To enable a permission simply add a check to the checkbox, or to remove a permission uncheck it. The permissions for the ability to Add, Edit, or View All objects will be shared across every category that is defined on the left-hand side. Each menu has additional permission options for specific tools available to that object/module as well as configuration and administrator permission options. All available Permissions options are listed in the next section.
When selecting the permissions for an individual user, there may be several permissions enabled that show a light blue background behind the checkbox with the text grayed out. These are permissions that are inherited from a User Group that the selected user is part of. The only way to turn off these permissions would be to either turn off the permission in the group’s permissions (see above section), or to remove the User from that User Group.