The content in this guide is currently being revised to align with the new user interface. Some text and images may be outdated.
Trigger Actions
Triggers consist of three parts. Frequency, Rules, and Actions. In this guide we'll be reviewing Actions, which are used to define the actions which your Trigger will take when its Rules have been satisfied.
Using this guide, you can understand:
- Adding a new Action
- The Update Field Action
- The Create Activity Action
- The Create Task Action
- The Change Status Action
- The Convert Request Action
- The Close Request Action
- The Close Period Action
Adding an Action
Now that you've configured your Trigger's Rules, you are ready to configure its Actions.
There is no limit to the number or variety of Actions which can be applied to a single Trigger.
To add an Action to your Trigger, select the Actions tab, and click the Add New Action button.
 Select the type of Action which you'd like to add, and you'll then be prompted for additional details about how the Action should be performed based on the type which you've selected.
-
Update Field: Select the field which you'd like to update, and the Default Value which you'd like to apply to that field. The alternative Title will only be shown when editing your Trigger, and is a great place to include more specific details about the update which you're making. Further details on the Update Field Action's options can be found in the Update Field guide.

-
Create Activity: Customize the content of the Activity which will be created, including its recipients, subject and body. The Activity Title will only be shown when editing your Trigger, and is a great place to include more specific details about the Activity which is being created. Further details on the Create Activity Action's options can be found in the Create Activity guide.

-
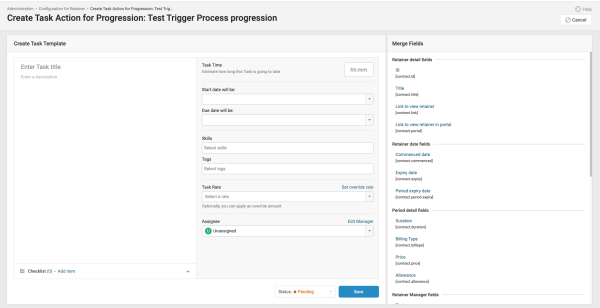
Create Task: Customize the title, description, assignee, start and due date of the task. While not required, the Due Date and Estimated Time are helpful in providing your team with a timeline for completing their task. Further details on the Create Task Action's options can be found in the Create Task guide.
-
Change Status: Select the new status which the work should be changed to. When the status is changed via a Trigger, no additional Actions, such as those assigned to a Progression are performed. The Title will only be shown when editing your Trigger, and is a great place to include more information about why the status change is being made.

-
Convert Request: Select the Conversion method which should be used, the staff member which the Request should be Converted As, and the Assignee (if any) of the newly-converted Request. The Title will only be shown when editing your Trigger, and is a great place to include more information about why the status change is being made.

-
Close Request: There are no options to configure for this Action. This Action simply closes a Request which is either waiting for the client's response, or has been responded to.
-
Close Period: Select whether you'd like to close the oldest or newest open billing Period. The oldest and newest period is determined by the Periods' Commenced Date.