User Permissions
[Tom] Hello and welcome to another round of Accelo Best Practices webinars. This is the second round of webinars we've been running, focusing on setting up users and their permissions. I'm your… Read More
[Tom] Hello and welcome to another round of Accelo Best Practices webinars. This is the second round of webinars we've been running, focusing on setting up users and their permissions. I'm your host Tom. I'm also joined by Saagar Gupta, who works in Client Success, and will be presenting today's webinar. We're gonna quickly run through an agenda at the top here, and just a few kind of basic high-level slides, and then we're gonna jump into Accelo and do a little bit more practical work here. So just quickly going over the agenda here, we're gonna run through adding in a user, and some of the basics around that. Understanding and utilizing groups within Accelo, and the permissions that go along with that. And then setting up these permissions by the individual level, as well as a User Group level. If you guys have any questions along the way, feel free to put them in the Q and A section of the Zoom account, and we will try and answer them along the way. If we don't get to them along the way, we'll leave some time at the end, and if we run out of time there, feel free to submit them to us directly, and we can get back to you with that. Okay, throwing it over to Saagar here, let's get going.
[Saagar] Hey, so your first action, is to add in a user. So common scenarios are first, if you have a brand new user that's coming on board, one of your staff members hasn't been added just yet, or potentially for this webinar, are also you might be editing current users. There's three things to keep in mind, that are more, maybe less intuitive than the others, setting up or adding in a brand new user. The first one is Rates. So you have a billable rate and a cost rate per user. So the billable rate is the billable value of work, each time the user logs time. So think of your hourly billable value. Your cost rate is an internal cost rate, and potentially an Admin overhead percentage, such as like 15 to 20% on average, that you'd like to have, to track profitability for a given project. So an example would be, say you have an intern, and they're billing at rate of say $30 an hour, and then their cost rate would be $15 an hour to your internal team. Anytime they log time, normally you'll have a $15 profit margin. Next, we're going to Financial Visibility, and this is really important, and done during adding in a brand new user, or editing a current user. So there's two options, Hours, Rates, Budgets, and Hours-Only. So Hours, Rates and Budgets allow the user to kind of, basically management or create projects and retainers, because you need to know the different rates per task and milestone, as well as say per retainer, you need to know what is say the step cost rate, or trying to set the billable rate, as well as the prepaid allowances and such. Okay, so Hours-Only would mainly be individuals that have no, basically your end users, and they're assigned out tasks, and don't necessarily need to know the rates and the budgets, or not the ones invoicing, and they're just kinda doing their work. That's gonna at least give access level. So you have four levels of access level, one's Admin, Professional, Collaborator and Contractor. Think of Admin, you're thinking of your major users, think of your executives, managing directors, chiefs, and essentially they can see both the billable rate, but also the cost rate, again the cost rate is not showing to Professional, Collaborator or Contractor users. Again, because we don't wanna associate salaried rate with the rest of the team. Admin users also get to see the utilization, profitability dashboards. They can see everyone's time sheets, and other aspect of things, such as setting up permissions and doing bulk exports. So your Professional users are mainly your day-to-day, full-time members of your staff, that are doing the work, managing the work, and so on. Now Collaborators, which are your read-only users, so think of your accountants, or think of your office manager that's just coming in to kind of just look at what work is there. You know, we've seen, say board of directors, and other sorts of more, like say investors can join your platform as a Collaborator. And last but not least you have a Contractor. So think of individuals that are kind of just there, from your base prospect project, or they're part-time to work on a few projects based on their skill level. They can only see what has been assigned to them, and maybe their clients that they have a task assigned for. The next Action Item, will be to add in a user group. So you have different user groups, so if you're thinking about maybe your project managers versus your developers, or I was gonna say your UI team, or you can do it, say by role. Say your executives, or your contractors can be a full-on group, as well as other types of, again maybe like think of the hierarchy of users. So essentially a user can be in multiple different groups, and the reason we say that, is because you can manage permissions at a group level, as well as an individual level. So for adding in a user, adding them to a group, there's three things to keep in mind. First, is that if you're adding in a user, you have the User Access and Financial Visibility. So again, thinking about that Admin versus Professional, or as seeing billing and rates, versus just seeing hours. You actually can go into the Group Permissions, and then you go into User Permissions. So again, the more access you're given, or the more groups you're in, the more access you have. You can manually give a specific…
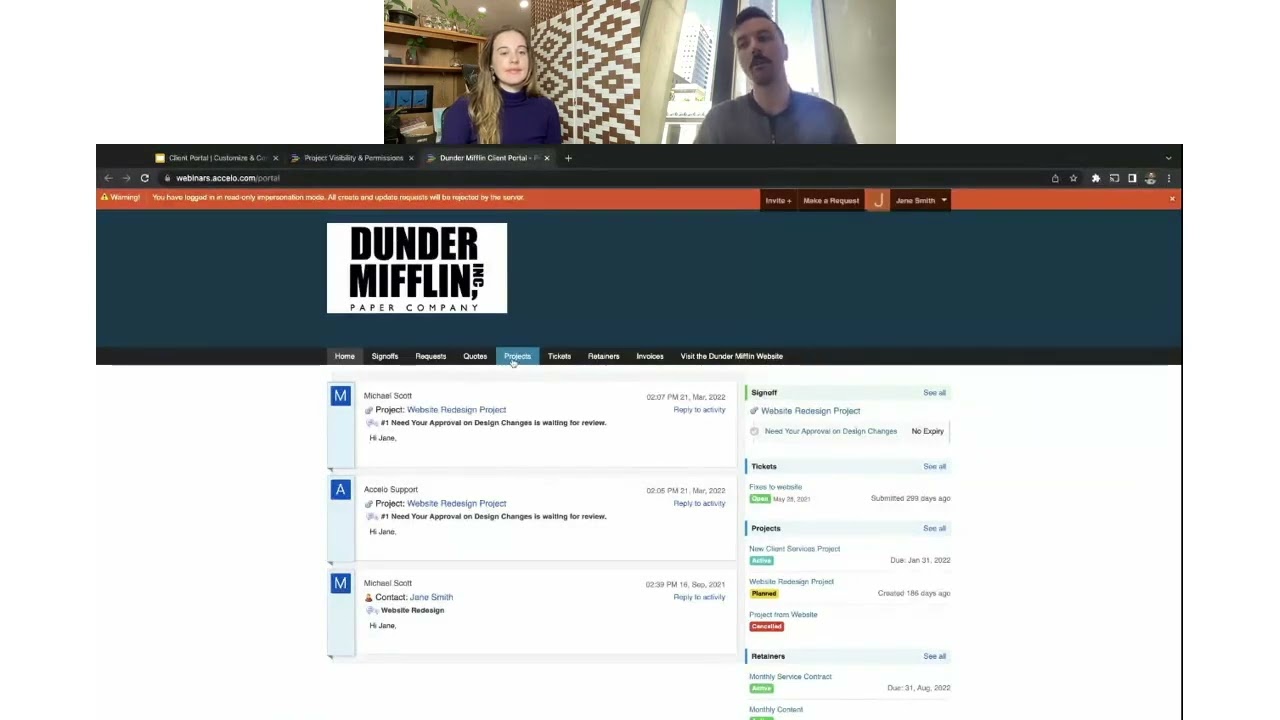
Client Portal | Customize & Configure | Intermediate
• Customize the look of the Client Portal
• Invite and impersonate your clients
• Set up global, project and company level…
Best Practices for Better Invoicing
• Customize Invoice Template styling and Custom Fields
• Show Work Report Summaries on your Invoice
• Incorporate Invoicing into your Workflows
•…
Survival to Recovery: Taking Control Again
This has been a year where most businesses have been knocked around, and the focus has just been on surviving.…

Best Practices for Scheduling & Resourcing
• Take advantage of Auto-Scheduled Time
• Understand the Booking Tool
• Determine when to Schedule vs Commit Time
• Navigate the Team…

Best Practices for Email Capture & Requests
• Email Capture Rules and Integration Settings
• Request Inbox Settings and Email Forwarding
• Email Aliases and Divisions
•…