
Feb 12, 2024
read
How To Add Company and Contact Information in Accelo
All products in the Accelo platform are connected through a unified client database to streamline company contact information with all aspects of your client work and provide one source of truth for your business. With a CRM that connects your sales, projects, tickets, billing, retainers and more, you can easily locate all of the logged work your team completes and connect it with the clients you serve.
- What Are Companies and Contacts in Accelo?
- Add Company Contact Information
- Add New Contacts to a Company
What Are Companies and Contacts in Accelo?
The Accelo platform keeps a record of all the companies you’ve interacted with — this includes your current clients, partners, vendors and leads — and each company field will have affiliated contacts.
A contact is an individual person that you communicate with. Accelo can automatically add contacts to your database by extracting them from your emails, which you can then export from the platform, making it easier than ever to complete mail merges or create detailed contact analyses.
While there are many client database features you can explore, in this article, we’re going to focus on how to complete two important tasks: how to add a company to your deployment and how to add new contacts to a company.
Add Company Contact Information
To add a company to your database, you need to enter a few key pieces of information.
Step 1
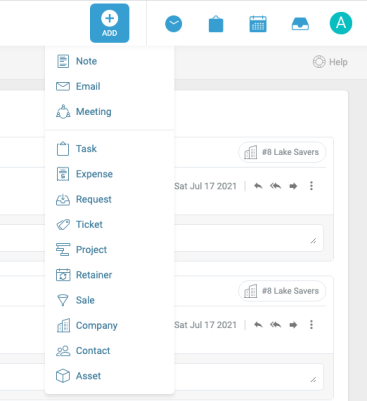
Go to the navigation bar on the top of your screen. Click on the +Add icon, located in the top right-hand corner of your screen.
Select Company from the dropdown list that appears.
Step 2
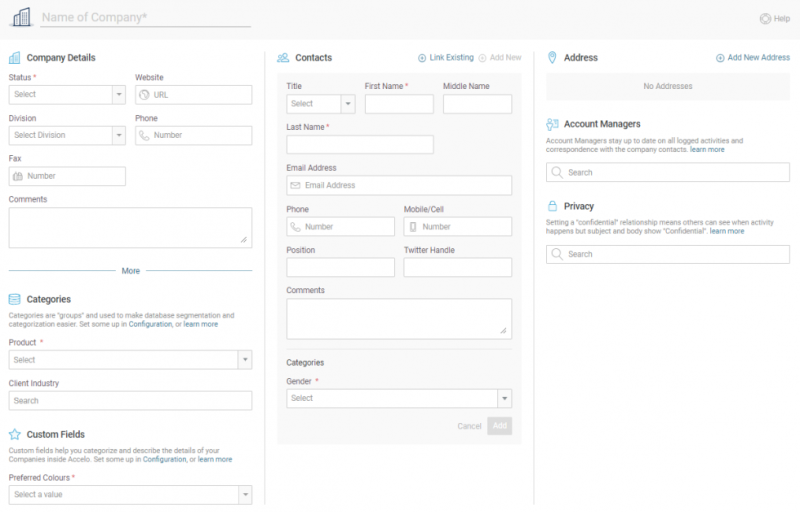
At this stage, you should be in the Add a Company screen.
Here, you’ll see a collection of fields including Company Name and Company Details. The detail fields you see will depend on the configurations you have set up in Accelo.
If you haven’t customized your configurations, you’ll see the following as default options:
- Status: The company status can be set as a lead, active client, vendor/partner or internal.
- Company Details: This section has multiple fields, including phone number, fax number and website.
- Categories and Custom Fields: These are categories that you and/or your team have added to organize client information. They can be customized in your Accelo account settings.
- Contact Details: In this section, you can record the contact information for at least one person associated with the company.
- Address: This records the primary address associated with the company. You can auto-populate this field using the Google search feature.
- Account Managers and Privacy: This section allows you to customize access to the company information and set any privacy rules related to communication about this client.
When setting up a new company, fill out as many of the available fields as possible. Make sure to complete all required fields, as indicated by a red star, so the system will allow you to save the profile.
If there are any fields you need that don’t appear on the Add a Company view, you can create them as custom fields. Custom fields are available across Accelo and let you track the information that matters most to your team.
Step 3
Click Create Company, located in the bottom right corner of your screen.
This will save the information you entered and take you to the View Company screen, where you can see all of the information available about that company.
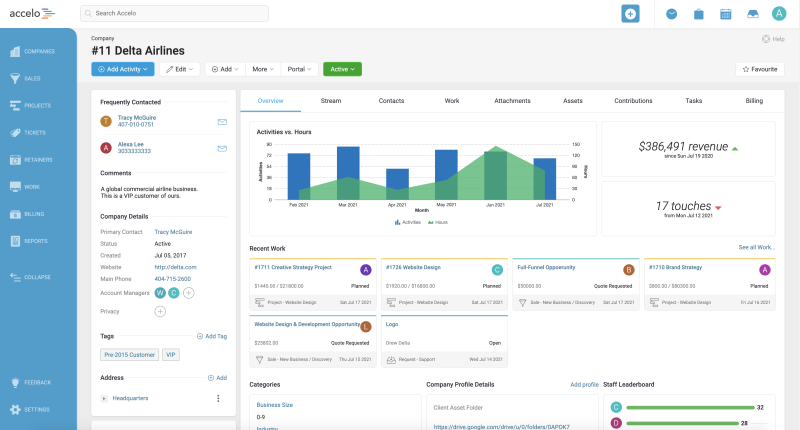
If you need to add or change anything about a company, you can do so from this screen. Just click the Edit button located under the company name.
Add New Contacts to a Company
The default settings in Accelo require that all contacts must be associated with an existing company.
NOTE: If you need to create a stand-alone contact, ask an administrator to enable the Allow Stand-Alone Contact setting in your account settings.
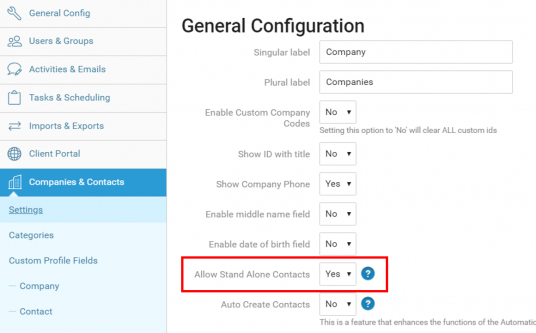
Once this is enabled, you can navigate to the Contacts menu and click New Contacts. From there, the process of creating a contact is the same as it is when you create one from a company.
Here’s how that process works:
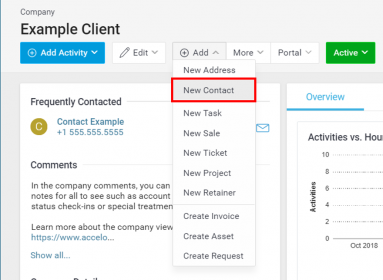
Step 1
From the View Company page, click the +Add button and select New Contact from the dropdown menu.
Step 2
Check to see if your contact is already in the system by clicking Link Existing Contact. Enter the contact’s name into the search bar. If they appear as a contact, you can add them to the company as an affiliation.
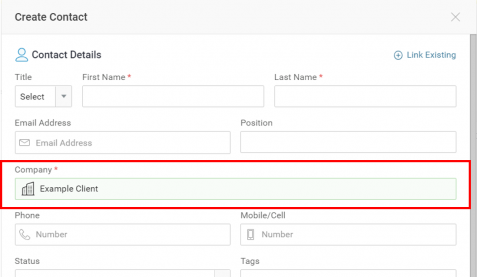
Step 3
If your contact isn’t already in the system, add them to the Create Contact screen by completing the available fields. The form requires you to have at least a first or last name. You also have the option to add personal information like an email address or phone number.
If you or someone on your team has already configured addresses for this contact, there will be a drop-down with available options. You can always add new addresses by clicking Other from the drop-down and entering new information.
Connect Your Entire Client Journey With Accelo
Accelo’s client database is a convenient and intuitive way to manage your client information, track the work your team does and connect it all in one centralized place. If you're like to learn more about managing client records, visit our help guides for additional support.
To learn more about how other service businesses have used Accelo to streamline operations and drive revenue, check out this case study roundup. You’ll hear more about the real-life results made possible with Accelo’s end-to-end client work management platform.
Hearing positive results from other client-based businesses is helpful, the best way to learn what you can do with Accelo is to try it for yourself. Sign up for a free trial to see the platform in action or request a demo to speak with a product expert.