The content in this guide is currently being revised to align with the new user interface. Some text and images may be outdated.
How can you add in additional Users?
Using this guide you can:
Adding Additional Users

To add additional users, click on the Settings button, navigate to the Users & Groups section and select Users to access your List of Users. Use the Add User button found at the top of the Users List. When adding a new user, you'll be prompted for their Name, Email Address, and other necessary details:
-
Managed by: Other Accelo user(s) who act as this person's manager
-
Skill: Tagging your users with skills enables you to search for users that share a similar skill set from your user list and more quickly identify which users share a similar skill set when assigning tasks and work using our Scheduling tools.
-
Groups: Groups which this person is a member of. These groups are used for granting access permissions, for assigning work using our Scheduling tools, and as delivery groups for notifications.
-
Default Billable Rate: The amount which you charge for an hour of this person's work. For additional details, see our help guide on setting up Rates.
-
Default Cost Rate: The amount which you pay this person for an hour of their work. This is used when determining the cost and profitability of their work. For additional details, see our help guide on setting up Rates.
- Timezone: Choose the user timezone manually or leave the timezone of your deployment.
- Start Date/End Date: When this person starts working with you and when they leave.
-
Invite User: Use this checkbox to automatically email them an invitation to log in to their new account.
-
Email Sending: Choose the email address which will be used as the From address when this person sends email from Accelo. Options range from their personal email address to a generic address such as [email protected].
-
Username & Password: Choose the username and password which will be assigned to this person. These can be edited by the user once they've logged in.
-
Financial Visibility: Select between allowing this user to see financial details such as budgets and rates, or whether they see that information translated into time estimates. For additional details, see our help guide on Financials Visibility.
-
Access Level: Choose the level of access which this person will have to Accelo. For additional details, see our help guide on User Licenses.
-
Admin: Full, unrestricted access to Accelo.
-
Professional: Your standard user who can log time, create & manage work, but can't administer Accelo.
-
Contractor: Part-time users who need to access and record their time spent on assigned work. This reduced-cost user level can record time, but can't manage complex work such as projects. Note: The Contractor Licenses are available on Premium Plans only.
-
-
Status: Should this new user be immediately able to access Accelo, or should their account be inactive for now?
After clicking Save you will be shown the Permissions page where permissions need to be enabled. By default, they all are disabled.
Note: when creating an admin user, all permissions will be turned on for this user.
Selected permissions are applied automatically, that is why there is no Save button.
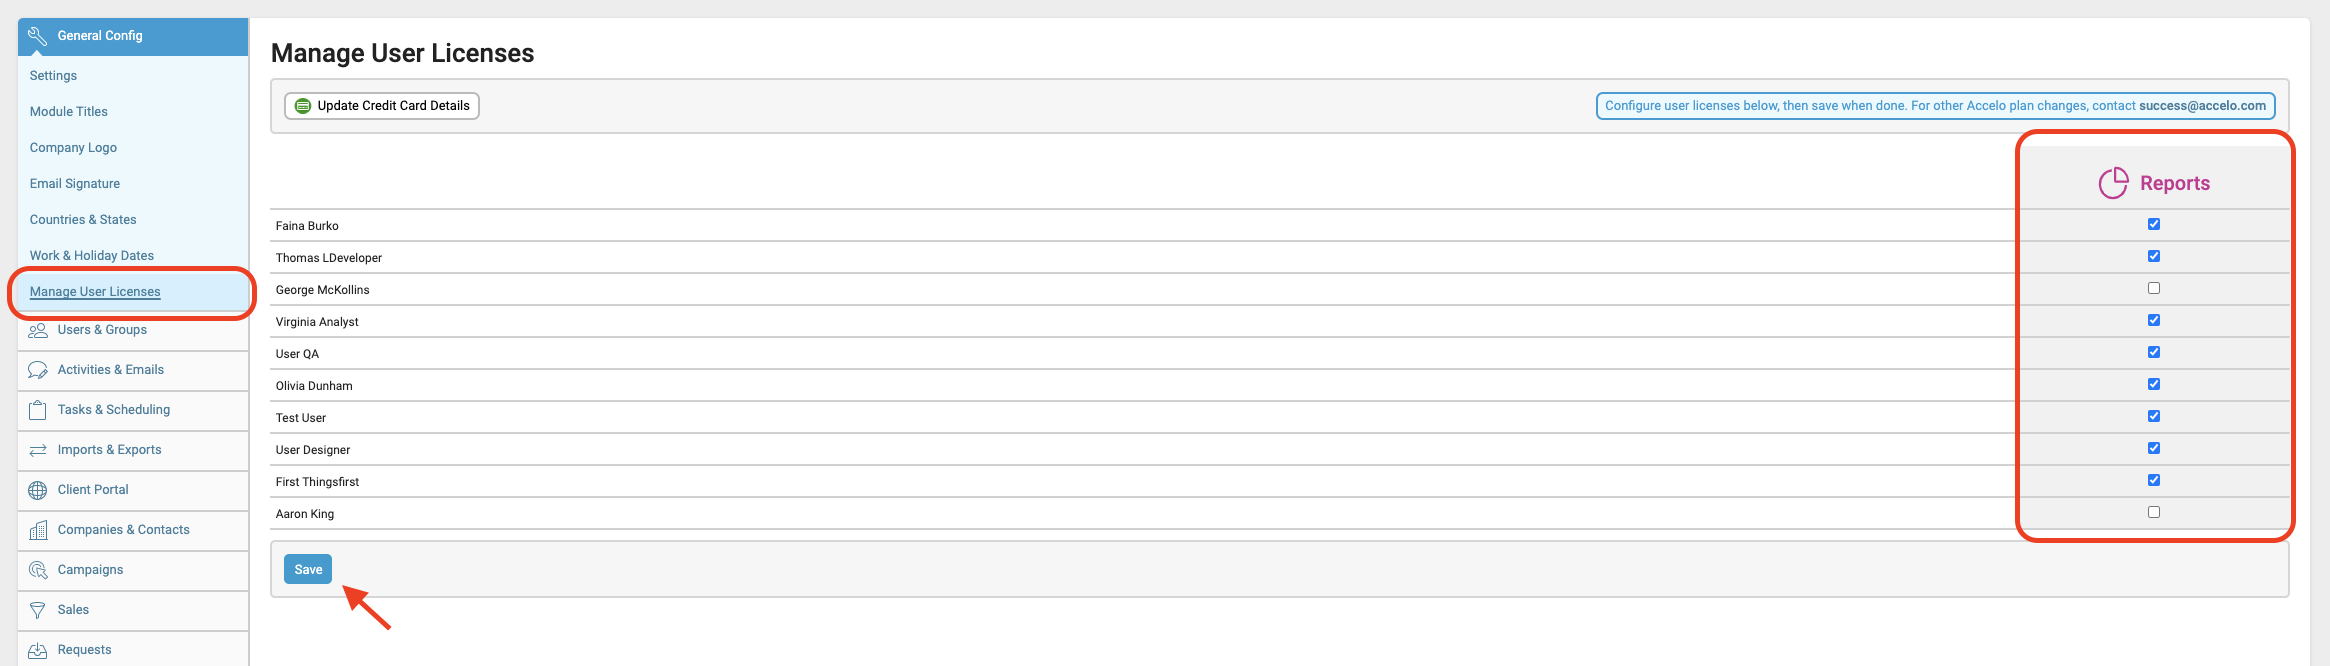
The important thing to remember after configuring permissions is to select the appropriate modules/product licenses the user will have access to in the system. This is achieved by navigation to Settings and click Manage User Licenses. If you have a ServOps plan, all modules including Sales, Projects, Tickets, Retainers and Billing are accessible. You can select if you want to grant access to Reports module (if you have one) for the user.
If you have Mix and Match plan, you need to select at least one of the modules.
Viewing User Details
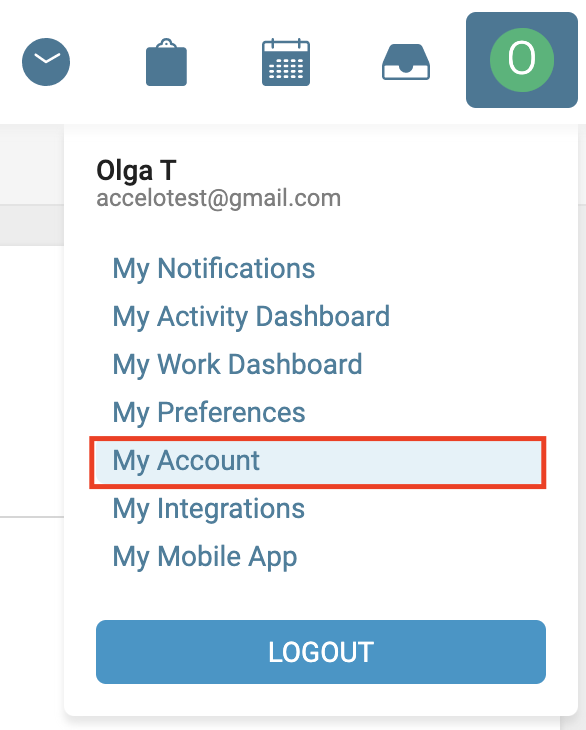
Now that you've created a user, you'll want to review their details to ensure accuracy. You should begin by reviewing your own account, by hovering over your name in the top right corner of the screen and selecting Account.
You can view other users' account details via the Users link and clicking their name.
User Summary
The main area of each user page provides a quick overview of the user's current contact details. By default, this contact information will appear in the signature of emails sent from Accelo. Below, you'll find additional details on this user, including:
-
Activity: The default view under this section is of your recent usage of Accelo - this is measured by the number of activities you have entered (in blue) and the number of hours logged (in green), on a week by week basis.
-
Managers: This tab lists any staff members that the current user is managing. Managing a user tells Accelo to cc you on any work they log or emails they send from Accelo. This is usually helpful within the first few months for orienting a new staff member. Managers can also view the timesheets of users that they are managing to ensure these users are logging their time properly.
-
Groups: The groups tab lets a user see which staff groups they are associated with. Each group grants its own set of additional permissions.
-
Division: Divisions is an advanced feature for businesses that have distinct service divisions, subsidiaries or international offices which use different email addresses and branding. The division tab allows a user to choose which divisions apply to their user account.
-
Signature: The signature tab allows a user to opt to use the admin-set signature or to create and use their own custom signature.

Changing Passwords
You and your fellow users may find that you need to change your Accelo password. To change that password, click the User Actions button and select the Change Password option. For G Suite users, this will read Set Web Filesystem Password, since you're accessing Accelo via your Google account, with your Accelo password only being used to access the web file system.