The content in this guide is currently being revised to align with the new user interface. Some text and images may be outdated.
Manage Expenses
The Expenses feature is beneficial for mobile users, enabling swift submission of expenses in real-time, complete with attached receipts or photos captured using the phone camera. Streamline the process to ensure timely submission, review, and approval of expenses.
In this guide, you can:
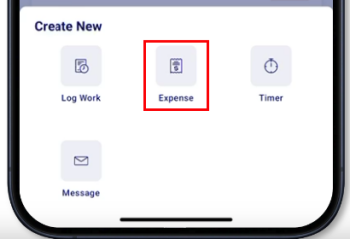
Submit an Expense
-
Tap on the Create button on the bottom bar
-
Tap on Expense
-
This will bring up the Create Expense Screen
 |
 |
On the Create Expense screen, enter the following details:
-
Receipt Attachment = Tap to add a receipt through the following methods:
-
Scanning a document
-
Upload from gallery = opens the device’s gallery to allow selecting a photo as receipt
-
Take a picture = launches the device’s camera app to take a photo
-
Import document = launches the device’s file manager app to select a file
-
-
Against Object = tap to select the object that the expense will be submitted against to (required)
-
Ticket
-
Project
-
Retainer period currently unavailable
-
-
Title = enter the title of the expense (required)
-
Owner = Select the staff or user who owns this expense. By default, the user creating the expense is the owner but can be modified.
-
Vendor = tap to select a company that is the vendor of the expense transaction (can be required depending on the expense type)
-
Expense Type = Tap to select from the expense types configured by the admin on the deployment settings
-
Item = select from the expense type’s item list
-
Unit = enter the quantity or number of units of the expense. Automatically filled based on the expense item but can be modified
-
Rate = enter the price of the individual unit. Automatically filled based on the expense item but can be modified
-
Purchase Price = shows the total purchase price based on the unit quantity and rate price. Automatically filled based on the expense item but can be modified
-
Type = select the tax type. Automatically selected based on the selected Expense type
-
Tax inclusive
-
Tax Exclusive
-
No Tax
-
-
Tax Amount = enter the tax amount. Automatically filled with the tax amount based on the expense type, item, and tax code
-
Billing = tap to toggle as billable or non-billable to the client
-
Sale Price = If the expense is billable to the client, you can also enter the sale price per unit, Also shows the computed markup rate between the purchase price total and sale price total
-
Reimbursable to owner = if the expense is reimbursable to owner, managers can mark the expense as reimbursable (only on web)
-
Price Summary
-
Purchase Price Total = shows the total purchase price with the tax amount entered.
-
Sale Price Total = shows the total sale price per unit multiplied by the number of units exclusive of tax
-
Once the required expense details are filled in, tap on the Submit button and confirm the submission.
View all Expenses
-
Tap on the More tab on the bottom right corner of the screen

-
Tap on Expenses

-
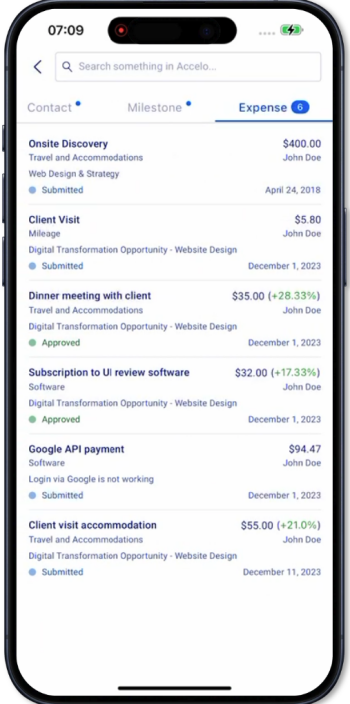
This will bring up a list of all expenses sorted in your Accelo deployment.
-
Search for a particular expense by searching the expense Title
-
See all submitted, approved and declined expenses against the ticket sorted by the incurred date with the following details:
-
Expense title = shows the title of the expense
-
Expense type = shows the expense type
-
Expense status = shows the current status of the expense
-
Sale Price and the markup rate = shows the sale price of the expense, shown only to users with financial visibility
-
Owner = shows the user who submitted the expense or whichever was selected as the expense owner
-
Date = shows the expense incurred date.Approve / Decline an Expense
-
-
Tap on the expense from the expenses list to go to the Expense screen
View the Object Expenses
-
Go to a Project or Ticket screen.
-
Tap on the Expenses tab.
-
See all submitted, approved, and declined expenses against the ticket sorted by the incurred date.

-
Expense list contains the following details:
-
Expense title = shows the title of the expense
-
Expense type = shows the expense type
-
Expense status = shows the current status of the expense
-
Sale Price and the markup rate = shows the sale price of the expense, shown only to users with financial visibility
-
Owner = shows the user who submitted the expense or whichever was selected as the expense owner
-
Date = shows the expense incurred date.Approve / Decline an Expense
-
-
Tap on the expense from the expenses list to go to the Expense screen
View, Approve, Decline an Expense
-
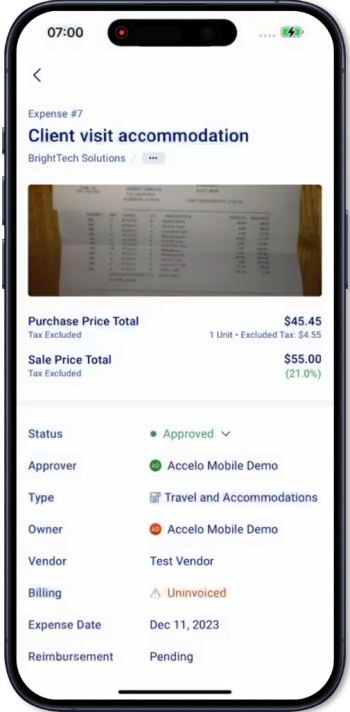
Tap on the expense from the expenses list to view the expense.
- This will bring up the View Expense screen.
-
On the Expense screen, see the following details:
-
Expense receipt attachment = tap on the file or image to view and download
-
Purchase price total = shows the purchase price total exclusive of tax. Also shows the number of units and the amount of excluded tax.
-
Sale Price Total = shows the sale price total exclusive of tax and the markup rate.
-
Status = shows the current status of the expense, whether it is still submitted, or already approved or declined.
-
Type = shows the expense type
-
Owner = Owner = shows the user who submitted the expense or whichever was selected as the expense owner
-
Vendor = the company selected as the vendor of the expense transaction (can be required depending on the expense type)
-
Billing Status = shows the billing status if it is linked, invoiced, allocated to budget, pending, or non-billable.
-
Reimbursement status = shows if it non-reimbursable
-
If you have permission to approve or decline an expense, then the approve and decline buttons appear at the bottom.
-
Approve = changes the status of the expense to Approved, allowing admins to bill the invoice to clients
-
Decline = changes the status of the expense to Declined, removing the expense from the list of items that can be billed to the client.
-
-
-
Once the expense is approved or declined, the status is updated. You can still decline an expense that is already approved or vice versa.
Not yet supported:
- Reimburse expense
- Edit an Expense