The content in this guide is currently being revised to align with the new user interface. Some text and images may be outdated.
Project Overview
Quickly look over the progress of a Project through the Overview tab. You may be managing several Projects at any given time and each Project’s Overview tab allows you to instantly see how your Project Plan is progressing, including getting a quick look at Milestones & Tasks and their Statuses, Earned Values, Usage / Budget and Key Dates.
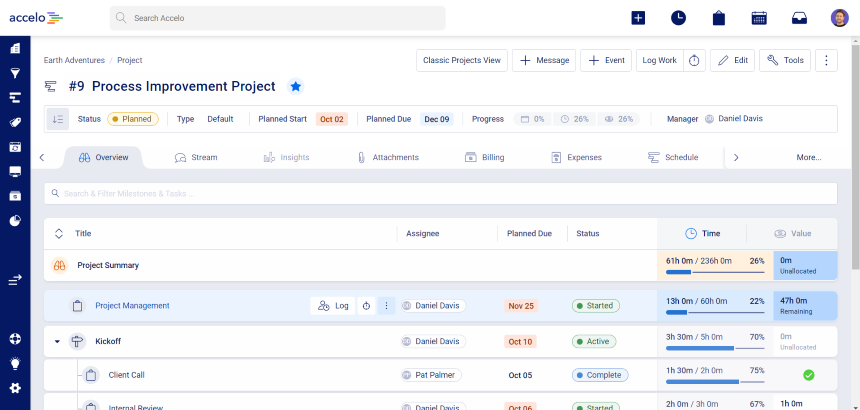
Project Plan: Oversee each part of a Project including the details, status, usage, budget and dates through the Project Plan Overview. View the active Status, real-time Budget allocations, rollup on Milestones and Tasks, and expected Due Dates that auto update based on previous work and how much there is to do in the future.
Other items you'll see on this view include:
- Status: Through this drop down, you can see what Status each line is in.
- Manager / Assignee: You can filter to see only milestones and tasks for the User chosen.
- Edit Plan: Quick link to the Project Planning tool.
- Add Task: You can add a task that was not originally planned.
- Usage / Budget: Presents a breakdown of the line's time budget, and its current usage
- Due Dates: The Task/Milestone's Planned Due date can be seen from the Overview. Click the date to see more information like the scheduled, actual, predicted or target dates. Learn more about Accelo's Dynamic Scheduling model.
- Actions: You can quickly start adding an Activity, Logging time or Splitting A Task.
Click Next to take a look at monitoring Usage for each part of the Project.
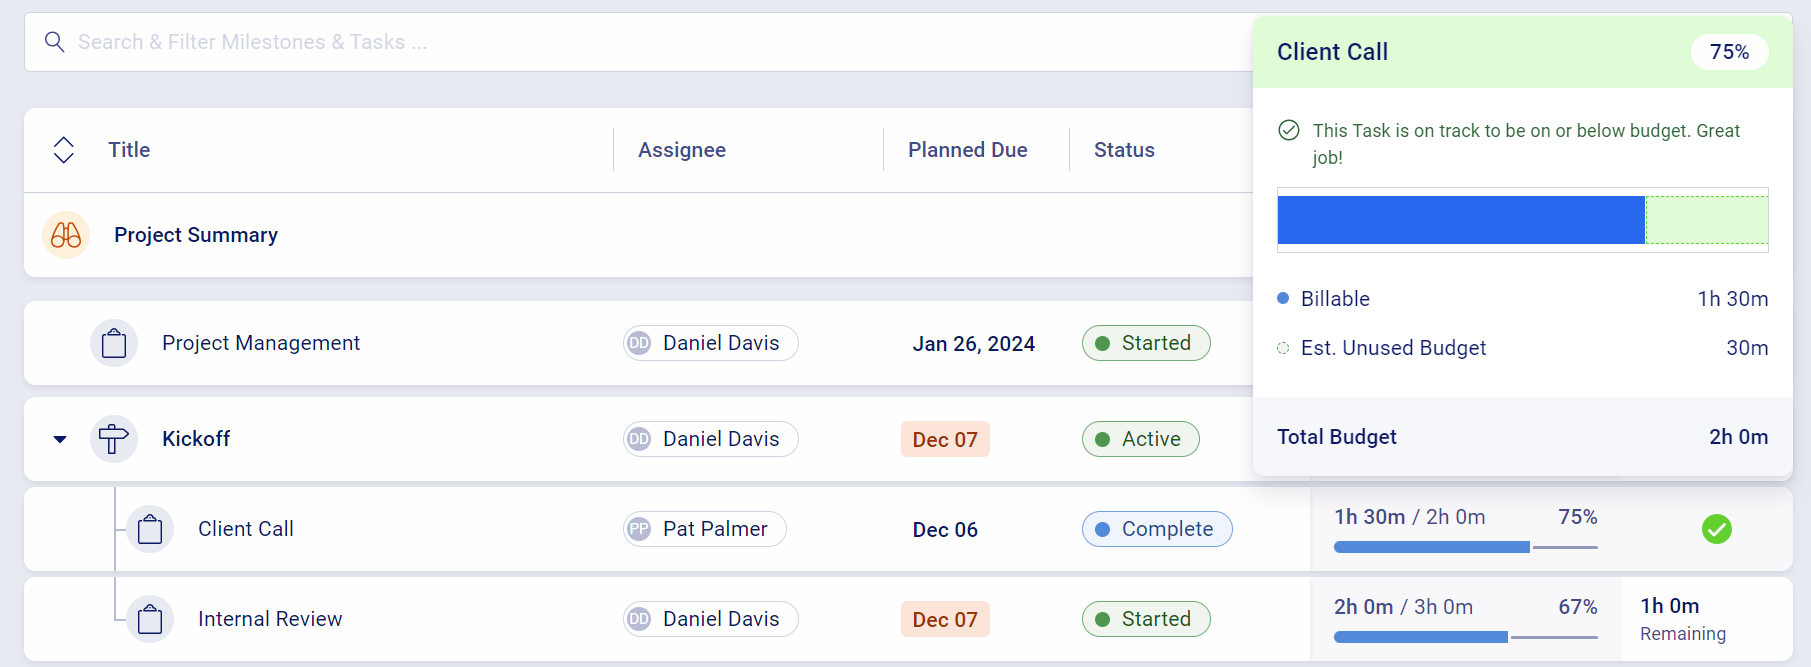
Usage by Value / Hours / Profit & Cost Analysis
In Accelo, each part of the Project has metrics for a Project Manager to follow along and make educated decisions moving forward. If you open up the Project Overview tab on any given Project, you’ll find your Project Plan. The Project Plan tool has a column to allow you to see if you are under or over budget for each segment. It also allows you to compare Profit to Cost (Staff’s time) for time logged.
After the Status column you’ll find a column with several options: Value and Time.
Value is essential to monitor and track usage by the billable rate * time logged through activities relative to the budget and time remaining. Time allows you to monitor the time logged through activities relative to the budgeted amount of hours and remaining hours left.
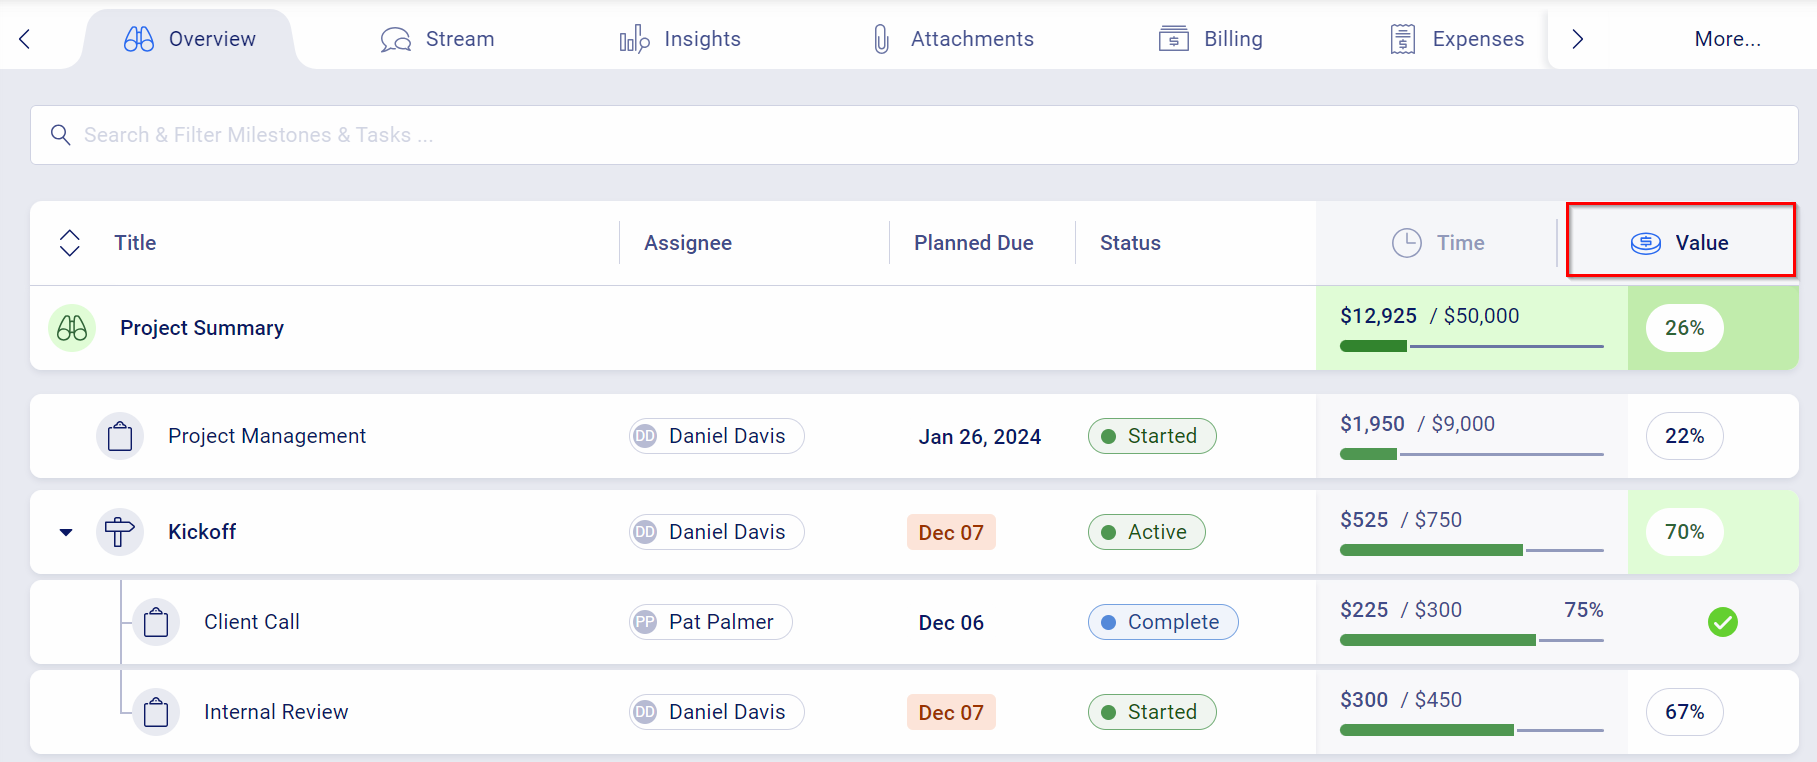
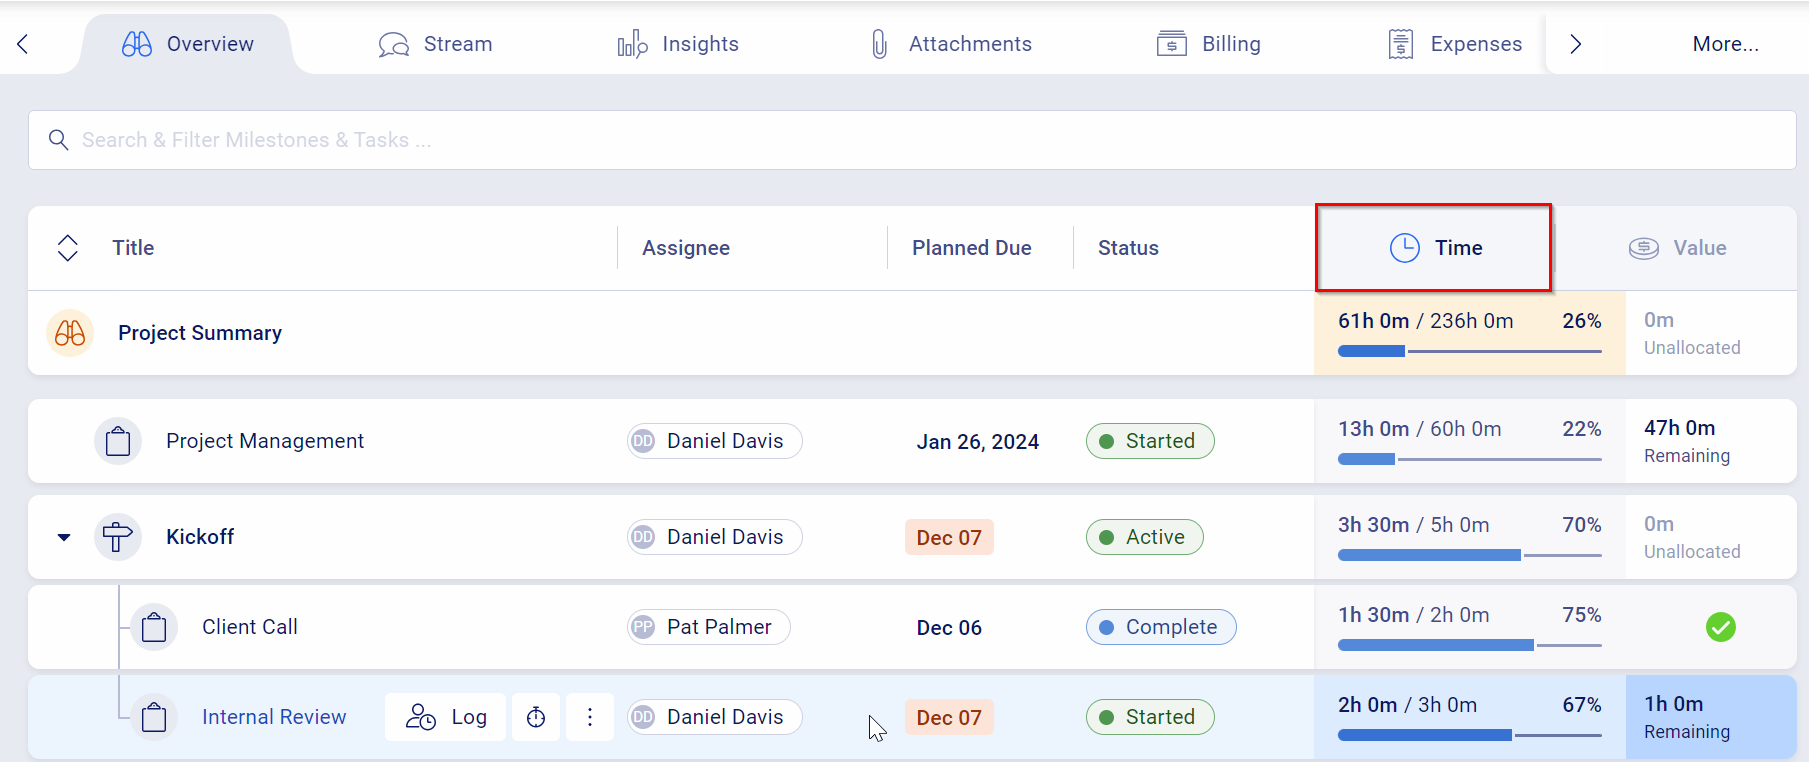 Clicking each option gives more relevant details.

Click Next to learn about Project Status Progressions.
Progress your Projects
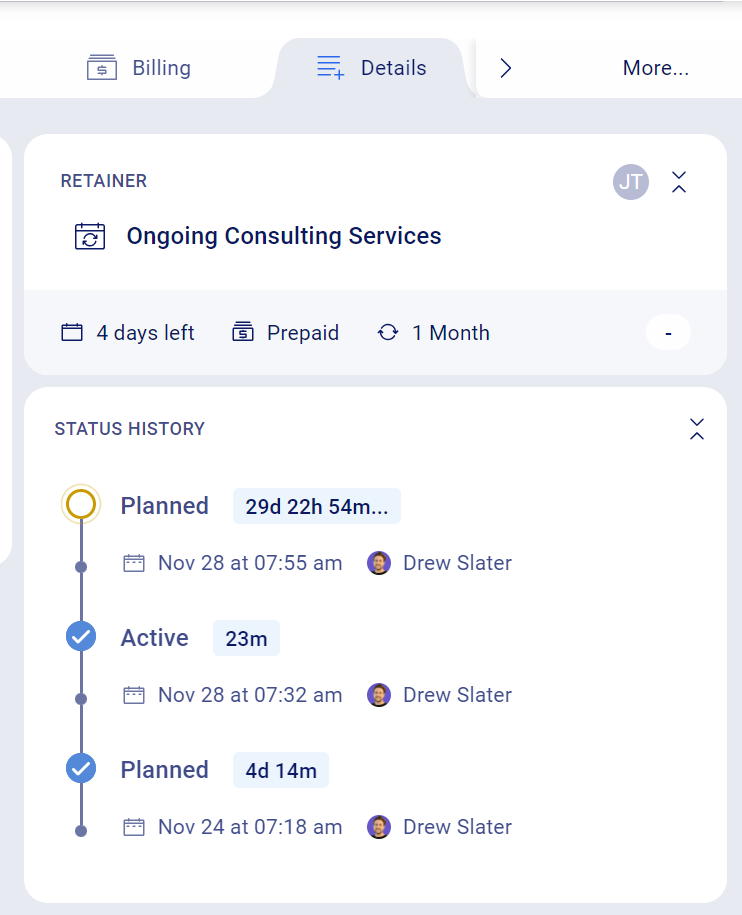
Progress your Projects through Status changes and track how far along you are on a Project. A typical Project lasts a certain amount of time and it is important to know how far along each is in your portfolio. You also have the opportunity to track, report and action on Projects under a certain status.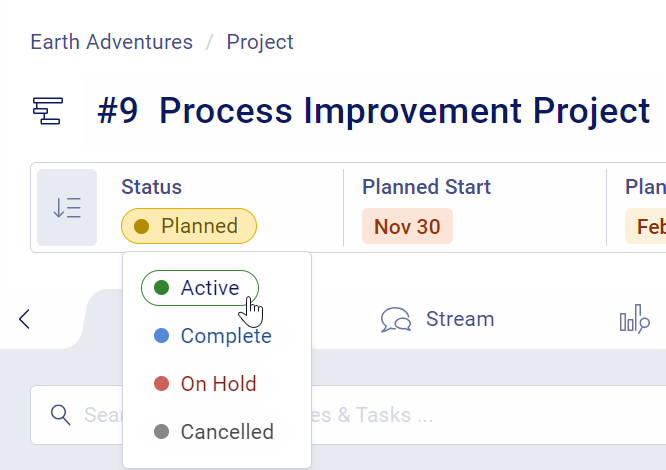
Set up additional tasks and template out activities to save your company admin time through the Progressions and Actions feature. If your Project process differs based upon what you’re working on, you are able to create different Project Types in Accelo to capture each of your processes. Your status progressions are specific to the Types of Projects, making it easy to set up processes for the different kinds of work you do.
Click Next to learn how to Assign Work for each part of a Project.
Triggers
Take the hassle out of keeping track of your work, your time and your client relationships with Triggers. Harness the power of knowing what's going on with client work, update key team members based on financial metrics and then take action automatically with Triggers & Notifications.
Assigning Work
The Assign Work tool can be accessed through any Project by clicking Tools then Assign. This is a useful tool if you want to alter important information after the Project Plan has been committed.

On this Assign Work tool, there are a few essential features that may cut down Admin time. This includes quickly being able to assign Tasks to your team through the drop down menu, manage Statuses of each part of your project, alter Planned dates, and alter the Total Time Remaining for each line item.

In many cases, the assignee/owner of a Milestone is also assigned to the tasks beneath it. Found on the left of any Assignee for each Milestone, you can find a button (![]() ) for Bulk Assigning all Sub Tasks if that is appropriate.
) for Bulk Assigning all Sub Tasks if that is appropriate.
Click Next to learn about Approving Work on Projects.
Approving Work
Make sure you are billing your Clients for the right amount at the correct rate at any time through the Approve Work tool. This tool allows you to both review all activities logged against a job, make any important adjustments and then Approve a portion of work for invoicing.
From the Project View screen, select Tools then Approve. 
See an overview of all activities logged directly against the Project, a Milestone, or Task. To see a further breakdown of each activity logged, click the Activities drop down (![]() ). Expand the drop down arrow next to Approved Activities and Previous Invoices to see details beneath each that have already been approved or invoiced.
). Expand the drop down arrow next to Approved Activities and Previous Invoices to see details beneath each that have already been approved or invoiced.
In one view, you can approve and invoice this logged work, move between billable and non-billable time, and change the rates for any time entry. You can also drag and drop Activities between Milestones to making sure you have them logged in the correct place.
On the right hand side of each Milestone, use the Approve button (![]() ) to have all activities under it marked as Approved within seconds.
) to have all activities under it marked as Approved within seconds.

Click Next to learn about Project Invoicing.
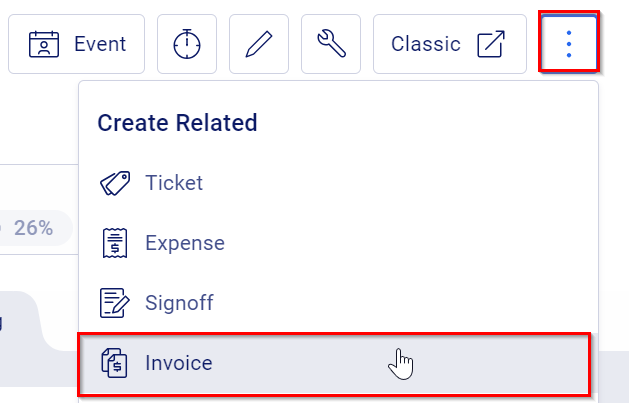
Invoicing
You can create and Invoice using the Invoice Tool from either the Project Billing Tab, or the 3 dot menu then Create Related Invoice.
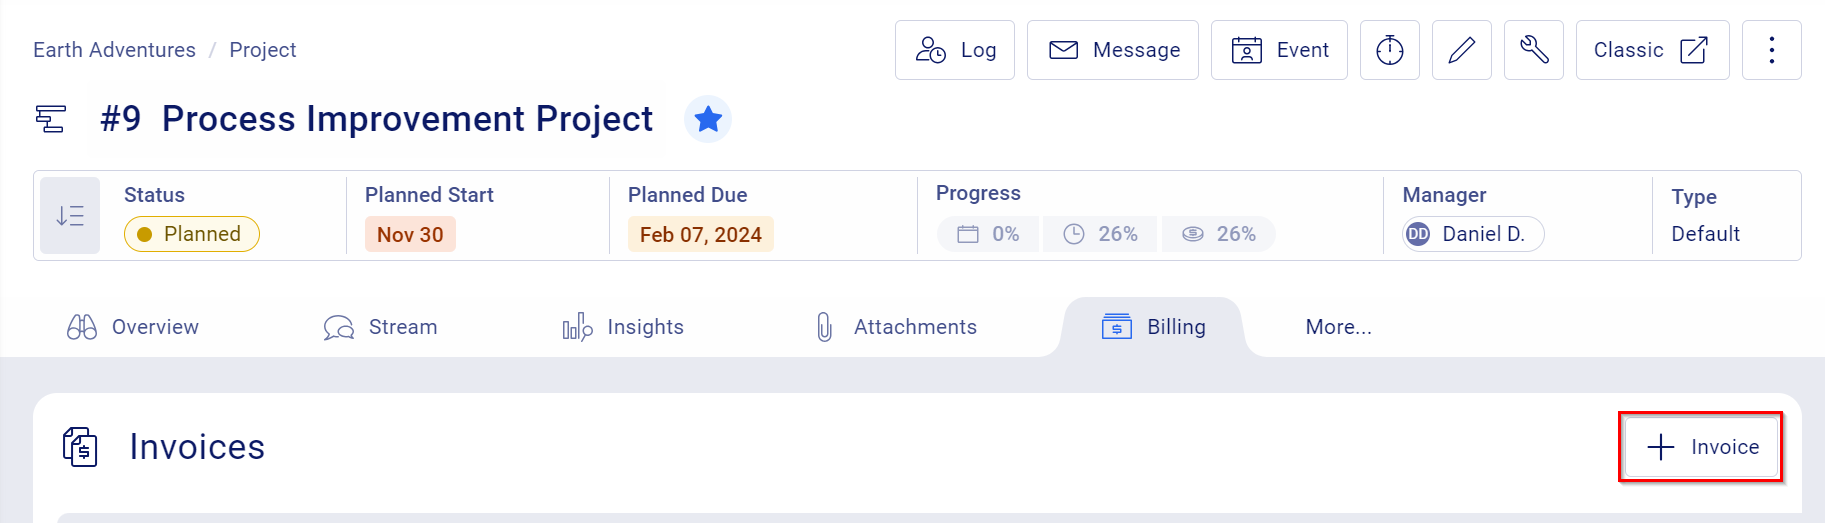
You can invoice for a deposit for the work you’re going to complete or invoice for the work you have completed in just a few simple steps.
The Project Invoicing screen is best understood in three parts which are broken up across the screen. These three parts are Invoice Details, Invoice Settings & Defaults, and Line items.
The first part, Invoice Details, has open fields to populate the general details including the Title of Invoice, Dates, and Recipient, and most importantly your Invoice Template.

The second part, Invoice Settings & Defaults, allows you to pick options, such as which parts of the Project you want to Invoice for. Much of this can already be pre-determined by your Invoice Template.

The final part is the heart of the invoice, all the Line Items. Depending on your invoice and activity detail, the Project itself, Milestones and/or Tasks can translate into a line item when you are invoicing. You can un-check boxes on the left side if you do not want them to appear on the invoice.