The content in this guide is currently being revised to align with the new user interface. Some text and images may be outdated.
Connect Zapier
Don't have the programming skills to integrate multiple platforms? No worries, Zapier and Accelo will handle it all for you! Zapier is a platform that connects more than 700 different applications together to automate the tedious parts of your day-to-day operations without requiring any technical expertise.
If you do have developers interested in the infrastructure behind our Zapier triggers, send them to our Webhook API documentation. Here they can learn how to subscribe to the underlying hooks that Zapier automate for you.
If your developers have any questions, have them reach out to us in the Accelo developer forum.
Not ready to connect?
Learn more about Accelo's Zapier integrations with:
Contents
Scopes
Zapier has three models of interaction - a Trigger, an Action and Searches.
-
Triggers are things an external application like Accelo can push across to Zapier. For example, a task being assigned or request being created.
-
Actions are things that Zapier can push into external applications like Accelo. For example, creating a new request or starting a timer in Accelo.
- Searches allow you to query other integrations for data that you can use in your Triggers and Actions. For example, looking up a request type in Accelo.
Triggers
New Request
This Trigger fires when a new Request is created in Accelo.
Behind the scenes, Accelo pushes the new Request's details to Zapier where you can apply filters and perform Actions in other programs.Filters are a great way re-arrange the Request's details before applying actions, like sending a notification to Slack or an SMS based on the client being a VIP. If you want to only trigger on certain requests, you can create a Zapier filter step after the trigger.
Task Assigned
This Trigger fires every time a Task is assigned to a new person. This applies both when new Tasks are created, and when existing Tasks are reassigned.
Behind the scenes, Accelo pushes the Task's details (including many of the details about the client and work which the Task is related to) for you to then use in a filter or Action. If you only want to trigger on certain tasks or assignees, such as, yourself, you can create a Zapier filter step after the trigger.
Actions
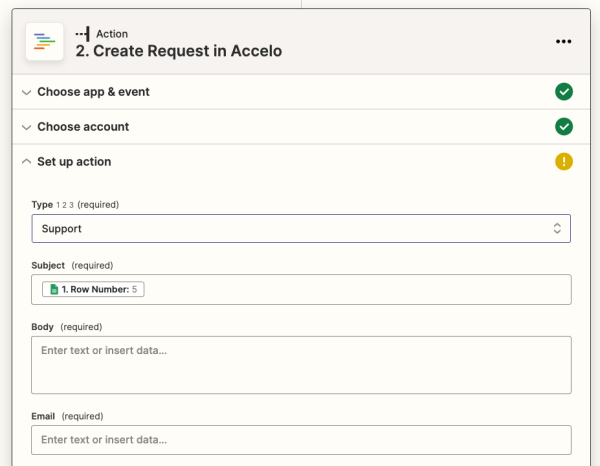
Create Request
This Action accepts inputs like the name of the client and contact, the request type, the title and the description/body of the request and creates the request directly in Accelo. Segmentations and profile fields for the contact and company are accessible in this step.
Create Timer
This Action starts a Timer in Accelo automatically; you need to specify the title/subject of the timer, and can optionally pass in the amount of time the timer should start with (in seconds) and whether the timer should automatically start "counting" or running.
Pause Timers
This will pause any running timers in Accelo; works nicely as a precursor test to creating a new auto-starting timer using the Create Timer option.
Create/Update Contact
Creates a new Contact, or updates an existing Contact in your Accelo account. Existing Contacts are identified and updated based on four details; all four details need to match exactly in order for the Contact to be updated:
- First Name
- Last Name
- Company Name
- Email Address
Custom Profile Fields, Extension Fields and Categories relevant to the Company and Contact can all be updated.
Create Sale
Creates a new Sale, Company and Contact in your Accelo account.
- A new Sale will always be created; existing Sales can not be updated through this action
- Existing Companies and Contacts can be updated, when their information exactly matches an existing Accelo record. The criteria is:
- Companies
- Company Name
- Contacts
- First Name
- Last Name
- Company Name
- Email Address
- Companies
Custom Profile Fields, Extension Fields and Categories relevant to the Sale, Company and Contact can all be updated.
Lookup Webhook Resource
Requests information on a record from Accelo, based on a webhook which you've received in Zapier.
Webhooks are automated notifications which can be configured in Accelo to occur in situations which you'd like to be notified of, such as Projects being created, budgets being exceeded, etc. For more information on creating and configuring webhooks, check out our guide. When a webhook is created, it sends the URL of the record which was updated to you, and looks something like "activities/347" or "jobs/500". This Action is used to pull additional information on that record from your Accelo account which can then be used in other Actions, such as sending an SMS to the project manager.
Activation & Authentication
Activation and Authentication are pretty straightforward for users thanks to the amazing work of our developer team and how professionally Zapier's platform works.
Enabling the Accelo Integration in Zapier
Enabling Accelo in Zapier can be achieved in two step:
-
Sign into your Zapier account. If you don't have one, sign up for one - it is free for 5 "Zaps" or integrations.
-
Click on "+ Create Zap" and find Accelo when you're choosing your Trigger or Action app.
Granting Zapier access to your Accelo account
When you first use the Accelo App to create a Zap (a recipe of things to do) in Zapier, you'll be prompted to give Zapier access to your Accelo account. The first step is to tell Zapier what your Accelo domain is:

If you're already logged into your Accelo account it will automatically complete and authorize Zapier to use the Accelo Public API on your behalf as a user.
If you're not logged in, you'll be prompted to log into Accelo first, and then authenticate.

Examples
Accelo Trigger: Slack Message when New Request is Created
In this example we'll create a Slack notification/message when you get an Accelo Request is created.
What we're aiming for: when a new Request of type="support" is created in Accelo, we'll notify the #support Slack channel with information about the request and a link through to view the request in Accelo.

Step 1: Create a new Zap with an Accelo Trigger of Create Request
Click on the "+ Create Zap" from the top of the Dashboard screen in Zapier.
After choosing/finding Accelo, you choose "New Request".
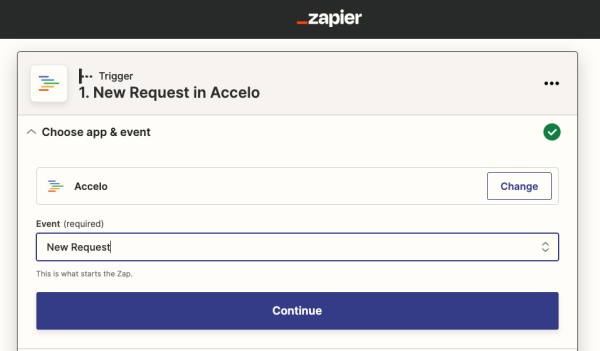
Zapier will then prompt you to Test a Request from Accelo. If you don't have any requests, you may need to create one. You should do this because it will give you specific examples to use when doing your field mapping in the next step.

Step 2: Send a Slack Channel Message
The next step is to choose your "Action" - in this example, you'll choose "Slack" and if you haven't connected to Slack yet you'll go through the authentication flow.
Once you've authorized Zapier to connect to your Slack account (first time only) and chosen the right Slack action, you'll get a screen like the one below where you can choose where and how the message is posted to Slack:

There's a lot of fields that Accelo exposes for use in the Message Text - this is why it is worth having an example Request that you just created for Zapier to play with.
We recommend use use the following URL for your Bot Icon URL so your Slack notifications look amazing:
https://www.accelo.com/assets/square-icon.png
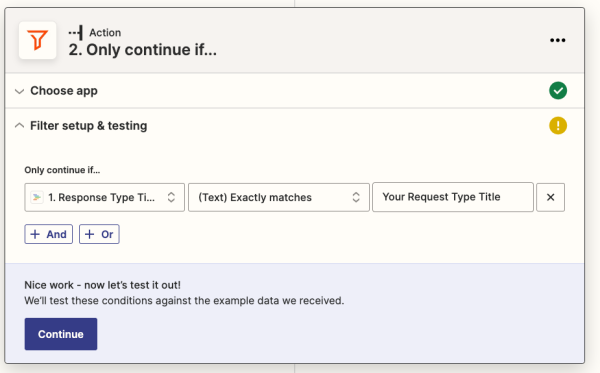
Step 3: Filtering Zaps by Field Values (optional)
Zapier allows users to create an intermediate step (or 3+ step Zap) which includes a "Filter" option. With a filter option, you're able to choose any of the Trigger fields to make sure only Requests of a certain type (or title, or client name, or anything else) get sent as your Action, in this case a Notification to Slack.
Accelo Action: Google Forms Submission to Accelo Request
In this example, we'll have new entries submitted from a Google Form, which needs to be saved into a Google Spreadsheet, and which then can come into Zapier and be pushed to Accelo as Request.
Step 1: Create your Form
The first step is to create your Google form. Create your questions, validation rules and before you make your first submission, you really want to click on the "Spreadsheet" icon under the "RESPONSES" tab - Zapier seems to depend on the data going into a Google Spreadsheet to find it.

Step 2: Create a Zap with a Google Spreadsheet Trigger
Once you've submitted a response, head over to Zapier and choose Google Spreadsheet and choose "New Spreadsheet Row".
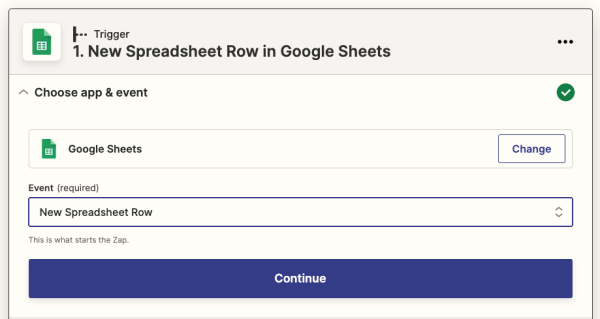
You'll then follow the wizard to choose the Workbook/File and the Sheet to watch. With the example imported, you'll be able to match the column headings to the Accelo Request fields.
Step 3: Set the Action to be Accelo's Create Request Action
The last step is to map the fields in the Form/Spreadsheet to the Accelo Request fields. Zapier shows you a list of all of the Accelo request fields, and you just need to line things up. Note that the "Body" field is able to have many field values contained in it, so feel free to put different field values from the Form/Spreadsheet on different rows.
When a new Form submission comes in, Google will store it in the Spreadsheet and then bring it into Accelo. While the Zapier integration says it will fetch new rows from the spreadsheet every 15 mins or so, in our experience it is much more real time than this.
Templates
FAQ
How do I filter triggers so that they only fire for certain tasks and requests?
You can achieve this by adding a filter step to your zap. A filter step sits between a trigger and action. It only progresses the trigger to the action if a given set of conditions are met. For example, you may only like triggers for tasks assigned to yourself. You would add a filter step that "only continues if" the new assignee id or username is an exact match to yours. For more information see this write up by Zapier.
Can I use custom fields when creating/updating contacts and companies with the create/update contact action?
Absolutely. We've opened up dynamic fields for profiles and segmentations (no extensions yet). They will appear as field options when creating a Create Request and Create/Update Contact actions. It's super easy to populate them with static or dynamic data retrieved in previous zap steps.
Note. we don't support lookup fields. They would require additional searches that we haven't hooked up yet.
I've lost access to my Zapier account. How do I disconnect Accelo so that triggers stop firing?
Navigate to the Webhook configuration by going "Configuration" -> "API" -> "Webhooks" or by navigating to https://YOUR-DEPLOYMENT.accelo.com/?action=list_webhook_subscriptions&target=list_webhook_subscriptions" where YOUR-DEPLOYMENT is replaced with your actual deployments name. From this screen you can see all your subscribed webhooks. You can remove any linked to zapier by clicking the delete trash can button. This will not only remove the webhook subscription from Accelo but tell Zapier to disable the Zap associated with it.