The content in this guide is currently being revised to align with the new user interface. Some text and images may be outdated.
Import Company and Contact information from CSV File
Mass import your client and contact lists into Accelo to add a large amount of contacts to your system at once, or make a mass edit update to your existing clients lists. When you keep all of your contacts in Accelo you have the benefits of things like central access across your team, address book sync with colleagues and automatic email capture.
Using this guide, you can:
- Export/Collect existing data as a CSV file
- Review your CSV for important data fields
- Running the import
Export / Collect existing data as a CSV file
Most sales or contact management systems (including your Outlook Address book) allow you to export your client information as a CSV or in another spreadsheet format which you can easily convert to CSV using Microsoft Excel.
Please note - when exporting or collecting your client information:
-
You must use a Comma Separated Values file (CSV) for your import to work properly.
-
Your CSV file must contain the Company Name, Contact First Name and Contact Surname at minimum.
-
Your .csv files should be limited to 1000 rows to optimize import performance. Files with more rows of data may stall out so that the import process does not complete.
Review your CSV for important data fields
If you have some custom or advanced fields that help you describe or classify your contacts, you may need to create custom fields if these fields do not yet exist in Accelo.
For example, if your CSV contains an industry column (indicating industry that a client relates to), and perhaps a trivia field like their favorite ice cream flavor, then it might look something like this:

Before you import, you should set up some custom fields in Accelo - either profile fields or category fields - using the same title and values options found in the specific column of your spreadsheet as found above.
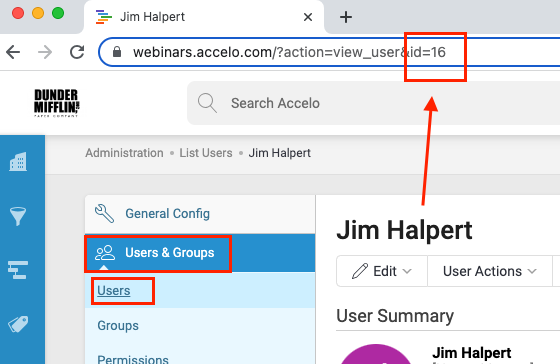
NOTE: If you intend on using a Lookup Profile Field with the import, then you must include a column for the Users' Staff IDs. To find each User's Staff ID, navigate to their individual user profiles in Accelo, then note the number at the end of the URL at the top of the page.
Running the Import
Once you've configured Accelo to have fields matching your import file, specifically any custom information, it's time to start the import. We'll be going over each step and configuration below.
You will need to have admin access to complete this process.
Uploading the CSV & Categorization
- Head to Settings in the bottom left corner and select Import Data under Imports & Exports.

-
From the Import & Exports section, click CSV Import: Company & Contact. Browse for the .csv file by clicking Upload CSV File.

-
Column values from your CSV will appear on the left. Drag the values to where they belong. They will either belong to the Company, the Contact, or the Address. Using the example in the CSV explained above, because I have no Address related fields, it would look like this:

Mapping CSV Fields
-
Map CSV Fields - Hitting next will take you to the page to map your CSV fields. Your CSV Column names will be on the left, and you'll tell the import which Accelo fields it will populate. In the same example provided above, mapping them should look something like this:

-
CSV Field - This is the column in your CSV by the same name with all the appropriate data values.
-
Accelo Field - This drop-down is where you'll decide where the CSV field data values will import to. The Accelo field names don't need to match the CSV, the important part is just informing the Import where the data should populate.
-
Fallback Value - The value defined here is what will populate the Accelo field if you don't have one provided in the CSV file. You can leave this blank if you don't want anything to populate for blank entries. Or in the example above, I could have everyone's flavor default to Vanilla if I have it blank in my CSV by entering it in the value "Vanilla" in my Fallback Value.
-
Delimiter - If your Accelo field can have multiple values, you can choose a delimiter. Such as a comma, ampersand, etc.
Matching & Merge Options
We don't expect everyone to import from a CSV only once, and you may have imported from other sources such as your integrations as well. Because of this, we offer a number of Matching & Merge Options should we find any Companies and Contacts that already exist in your Accelo account - or any duplicates in the data you are about to import. We'll be going over each one below.

-
Matching Companies - Choose how Accelo identifies what is a duplicate/matching Company. By default, we will identify it based on the Company Name - which is usually enough - but you can require a match to include other fields from your CSV import, such as the Company ID (useful if you are updating company data via the import and some companies might have changed names).
-
Matching Contacts - Choose how Accelo identifies what is a duplicate/matching Company. By default, we will identify it based on the Contact First Name and Last Name, but we strongly recommend also identifying on "Email" as well, provided this field is mapped in your import. If you only match on the names, then 2 completely unrelated contacts with the same name (e.g. "Joe Brown") would be regarded as the same person, resulting in 1 contact with a link to 2 unrelated companies.
Take your time with the Contact Matching settings. Consider importing a small amount of data first, to confirm the settings you've chosen are working as you need them
When a Match is Found: You can choose which of the following options to apply.
-
Do Nothing - Skip: We will not touch the existing match in Accelo, and will not import any values in the row of that company row of the CSV import.
-
Do not overwrite - Only update empty fields: We won't overwrite any existing data, but if we find any empty values in Accelo that have been mapped in this import, we will populate the blank Accelo fields with the imported values.
-
Overwrite - Update all fields: Every mapped and matching field in the CSV import will overwrite any existing Accelo field.
When multiple matches are found: You can choose which of the following options to apply.
-
Match most recently created - Match the one that has the most recent creation date within Accelo.
-
Match first created - Match the one that has the earliest creation date within Accelo.
-
Match most recently edited - Match the one that most recently has had an edit to its key fields. Such as a Manager, or a Status Progression.
Mandatory Fields
Depending on what fields you chose to import, there will be some required fields that need a fall back in case you have empty values. We recommend using our merge fields when the Company field is empty, which replaces it with Contact field values:
- [contact.firstname] - The first name of the Contact
- [contact.lastname] or [contact.surname] - The last name of the Contact
- [contact.email] - The email address of the Contact
For any other mandatory fields, we leave it to your discretion. For example, "Main Contact" is a possible fallback if the name is empty.

Preview
At last, we're at the final steps! You'll be given a preview of your import and how the fields will be mapped within Accelo. Based on my examples above, it would look something like this:
 As you can see, it looks very similar to my CSV Import file. If things have gone right, your preview should look very similar to your CSV Import. The only difference is the column names are now named after the Accelo field it will be going under, and whether or not that field belongs to either a Company or a Contact.
If everything looks correctly mapped, hit Complete at the bottom right, and you'll receive a final confirmation. Hit Proceed after that, and your import will begin.
Import Results & Viewing the Log
The import process may take a few minutes depending on the depth of your CSV. During this time, you'll find a "View Log" option available where you initiated your Import.
 The log will give you a very detailed breakdown on what was successfully imported, and what wasn't, and can even be expanded to show you the details and logic behind each field being mapped. In the example below, my ABC Company was matched to an existing company, so it was only partially imported (new fields imported, but old ones not overwritten) based on my matching preferences.

When the import is done, you will also be given the opportunity to download the results in an email notification that is sent to the uploader.
Note that all three results files are generated regardless of whether there were any warning or errors.
The import process will avoid duplicating companies.
Accelo will recognize if a company you are importing already exists, and will update the details based on the data in the spreadsheet. To see the details of what records were created see the _created.xls.
Also, if a company is listed twice in the importing spreadsheet, it will only be imported once, with the details of the later version being the ones that are saved. The same method applies for contacts at a company. However, if you have the same contact at different companies, or no company, they will both be created as unique contacts - this is often the cause for duplication.
If you find you still have a lot of duplicates contacts in the system after importing, you can manually clean them as you discover them through merging.