The content in this guide is currently being revised to align with the new user interface. Some text and images may be outdated.
View a Project
Get access to all of the important details surrounding your projects. These details include everything from profitability reports and budget forecasting, to Gantt-chart scheduling and client sign-off requests, and everything in between to help you manage all of your Project needs.
Using this guide, you can view the:
- Overview: See the big picture of what's happening within your project (Milestones & Tasks)
- Schedule: View the expected delivery timeline
- Insights: Get a deep dive into the engagement, budget, profitability, work done and work remaining
- Stream: Find all related activities
- Attachments: Upload and share documents internally or with clients
- Expenses: Track expenses like printing and travel
- Invoices: Invoice customers for the work you've done, whether it's fixed-priced or time & materials
- Sign-offs: Get your client's approval on project-related documents
- Linked Assets: Connect object related to a project such as a server or a billboard
- Details: Includes custom fields and financial information
- Other features
- Export A Project Plan
- Pause a Project
View Project
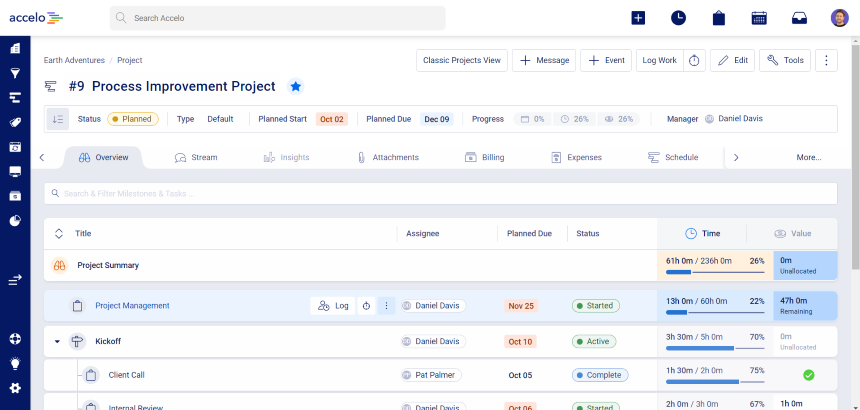
The Project View screen gives you a bird's-eye view of the Project Plan. You can get a quick overview of all the different line items within your Project Plan with a quick deep-dive of the progress of all work logged across Milestone and Tasks.
Listed across the center of the screen are several sections and tabs containing information to help you manage your Projects.
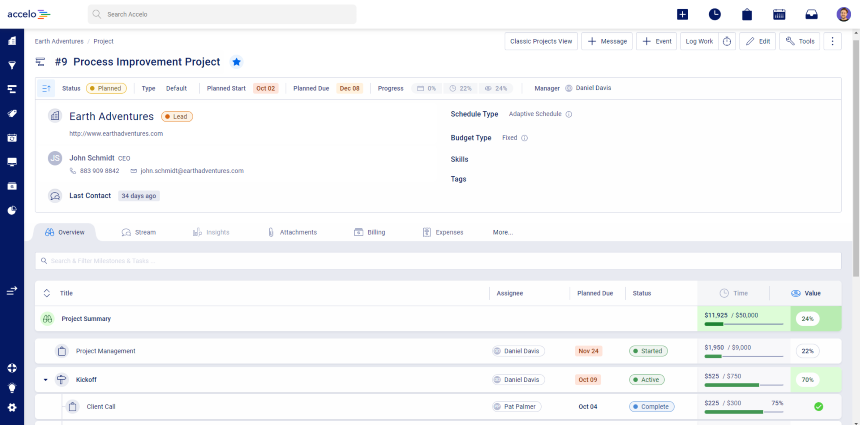
Project Details Section
On the top bar when viewing a Project, you'll find information such as the Owner, Type, Team, Earned Value, Progress and any other Custom Profile fields you have configured.
- Manager: This is the main internal User managing the entire Project Life Cycle.
![]()
- Team (Coming Soon): These are all the internal and external stakeholders involved.

- Earned Value: Based on the budget, this is the value of billable work currently logged against this project.
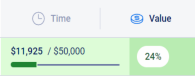
- Progress: Based on Tasks, time budget, and currently logged work, this is the how far we've come to completion.
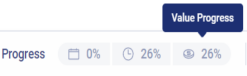
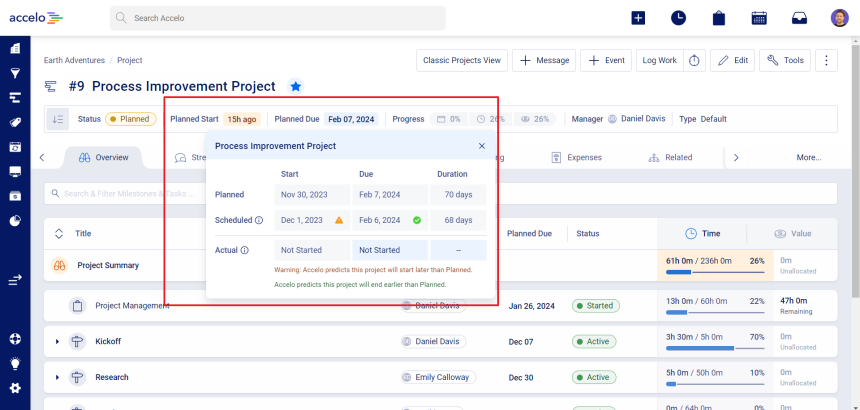
- Schedule: You can track how far along you are relative to your planned scheduled dates.

- Important Dates: These are the key dates for this given Project.
-
Skills: For each Project, you can track the necessary skills required for completion.

- Tags: You can specify specific tags per Project for filtering purposes.

- Additional Details: This is meant for your Custom Fields for each Project Type or Unified Custom Profile Fields.
- Email Alias: This is an email alias to cc or bcc to make sure communications go under the correct Project Stream if sent outside of Accelo.
Project Plan Overview
While planning a project can be exciting, executing on that plan is often a challenge. The Project Plan arms the Managers with the information a professional business needs to stay on top of delivering excellent work. Keep your eye on the active status, real-time budget allocations, rollup on milestones and tasks, and expected due dates that auto-update based on the previous work you are waiting on and how much there is to do in the future.
Clicking on the block of the Milestone or Task will bring you to a real-time activity stream and general details for that area of the project, so that you can find the story behind the project.
-
Status: Through this drop-down, you can filter by what Status each line item is in.
-
Assignee: You can filter to see only Milestones and Tasks for the User chosen.
-
Edit Plan: Quick link to the Project Planning tool.
-
Add Task: You can add a task that was not originally planned. *NOTE: You will be able to set the Task Budget from this modal. Click here to learn more.
-
Project Plan: You can view the current Project Plan (Milestones & Tasks).
-
Metrics: You can understand each line item by Task.
-
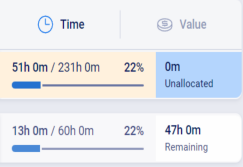
Usage / Budget: Presents a breakdown of the line's time budget, and its current usage.
-
Start & Due Dates: You can see the several aspects of your project's Start and Due Dates which Accelo tracks, including the Planned, Target and Actual Dates. Learn more about Accelo's Dynamic Scheduling model.
-
Actions: You can quickly start adding an Activity, Logging time or Splitting A Task.
Schedule
Track your project's progress visually, and ensure that you're never surprised by your project's progress with the Schedule's Gantt chart.

The Gantt includes a breakdown of the Planned, Predicted, Target and Actual Dates for each Task and Milestone, as well as an indication of the work's overall timeline:
-
Solid Black Line: Planned Dates
-
Dotted Line: Predicted Dates
-
Dotted Outline: Target Dates
-
Solid Outline: Actual Dates
The Gantt also uses color-coding to identify whether these dates are behind or ahead of schedule:
-
Green: Ahead of Schedule
-
Orange: Expected to Complete Behind Schedule
-
Red: Actively Behind Schedule
Project Insights
On the View Project page, the Insights tab allows managers to ensure that a project remains on track, and if not, see where the issues are occurring from a high-level perspective and holistic view of the financials. The sections in this tab may look different for individual users as it considers permissions and financial visibility.

- Activities vs. Hours: Breaks down how much time is spent on activities, so that a manager can determine whether there are abnormalities such as:
-
-
Too much or too little time spent on activities within a project.
-
Billed hours not correlating with actual activities completed.
NOTE: Activities that have time logged in seconds can add up over time and may skew results.
-
-
- Value: You can track the earned value based on the billable amount of work done. You can also track the forecasted value if you are/were billing by the hour.
-
-
Earned: Total billable time logged on the project. All revenue of the project.
-
Percentage is the earned value / total budget x 100.
-
-
Forecasted: Total billable time expected to be logged based on the project plan budget.
-
Percentage is the forecasted value / total budget x 100.
-
-
-
- Financials: Tracks the overall project performance and whether it is currently within or has exceeded the allocated budget by looking at the breakdown of financials.
-
-
Managers who want more control over their projects are able to approve time logged for billing before it is invoiced to the client. Selecting the unapproved link will take the manager to a breakdown of the time logged as billable and allow for modifications to be made.
-
-
- Profitability: You can track current profitability based on work done and forecasted profitability.
-
Current: Total earned value (or revenue) minus total costs.
-
Percentage is the total profit amount / total value x 100.
-
-
Forecasted: Total forecast value (or revenue) minus total forecast costs.
-
Percentage is the total forecasted profit amount / total budget x 100.
NOTE: These are hypothetical numbers to give an estimate of forecasted amounts. It takes into consideration billable time remaining on the project.
-
-
-
Work: Tracks the allocated and unallocated tasks associated with the project. Breaking the tasks down into Work In Progress, Work Done and Forecast.
-
Work in Progress: The total project task time remaining to be completed.
-
Work Done: The total project task time that is completed.
-
Forecast: Expected project task time remaining (including non-billable time).
-
-
Work Done: See the top five members of your staff who are logging time against this particular Project. The total time logged for each individual user can be found on the right-hand side.
-
Budget: Tracks all users assigned to milestones or tasks within a project and whether they’re currently over or under their allocated budget amount.
Stream
Quickly see the most recent activities recorded against the Project, including any relevant emails, phone calls, and internal notes to help your team keep track of progress.

Attachments
Work internally or with clients on files related to the Project. Accelo allows manual uploads as well as integrations with popular file storage solutions like Google Drive, Dropbox, and Box. Learn more about Attachments.
Expenses
Submit and view all Expenses related to the Project. To quickly create an expense, click the Create Expense button. You will be redirected to a new page where you can add expense details, cost, and whether this expense is reimbursable and added to your project costs. 
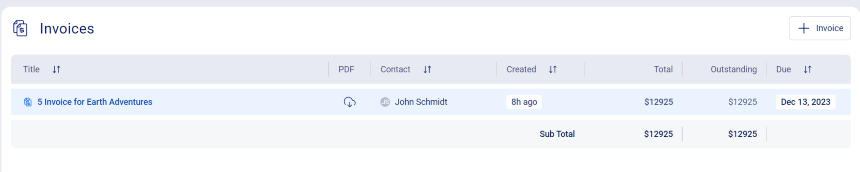
Billing
See all Invoices and Purchases created for this Project in one place. If you need to add an invoice or purchase, do so quickly by clicking Create and choosing to Create an Invoice from the menu bar.
Signoffs (PREMIUM)
Send attachments/designs/proposals to clients and get them to “sign off” before completing work. See any previously sent Signoffs, or create one quickly by choosing Create Related Signoff found under the triple dot drop-down in the top-right corner. This will redirect you to a new screen where you can complete the Signoff Process. 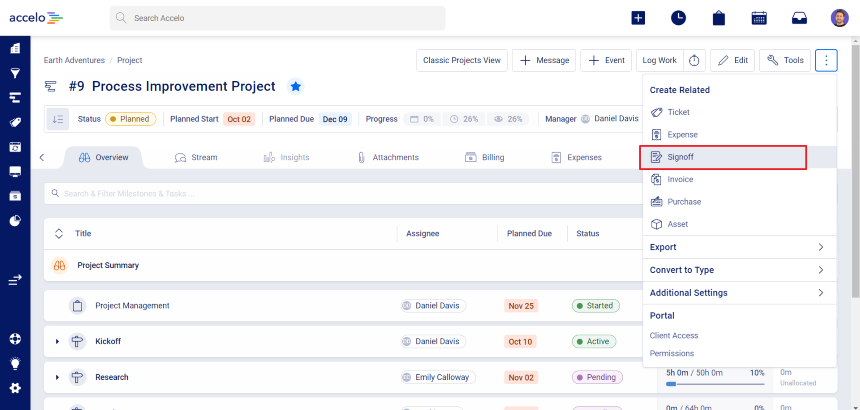
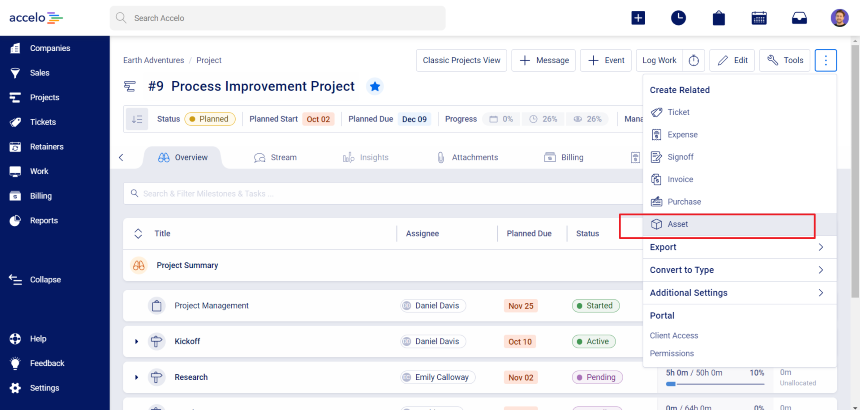
Linked Assets
See all assets linked with the Project. To quickly add a Link to an asset, click the triple dot drop-down in the top right corner Create Related Asset.
Details
You can view all the different details for your Project here. This includes Custom Fields and Unified Custom Fields. 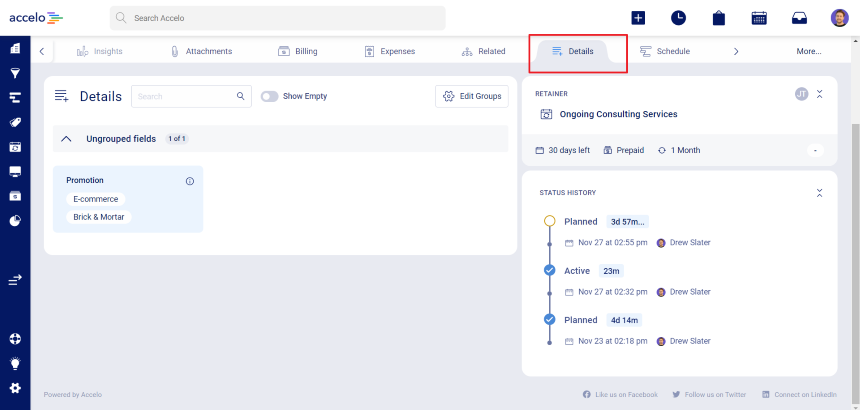
Other Features
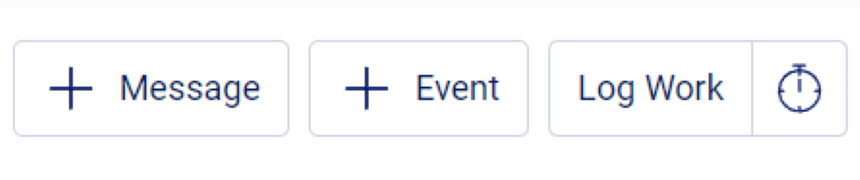
+Message (Note, Meeting, Email, Call, Postal)
Click +Message to add a message/ log time on this Project. Fill out details, such as Billable vs Non-billable for invoicing purposes.
Assign Work
The More > Assign Work option is an advanced feature which allows you to swiftly assign out work to individuals that are directly responsible for the completion of that given task. This also allows you to easily manage Statuses and Dates per line item.
Manage & Approve Time (PREMIUM)
The More > Approve Work option is another advanced feature which allows you to view all work completed and easily drag and drop logged unapproved activities to the Approved Activities section. This saves you a time from individually approving every activity.
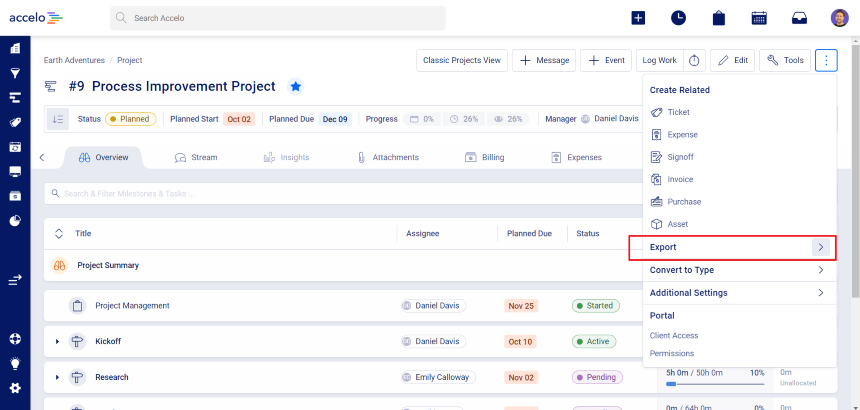
Export Project Plan
The Export > Project Plan PDF option can be used to export the Gantt chart view of your Project to a PDF file, perfect for sharing with your customers and wider team. Simply click the option found under Export > Project Plan PDF or Create PDF icon (when in the Edit Plan view)
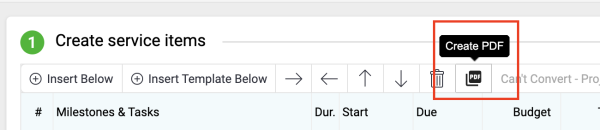
You will then be able to select the detail of the export, once your selections have been made click Create PDF.
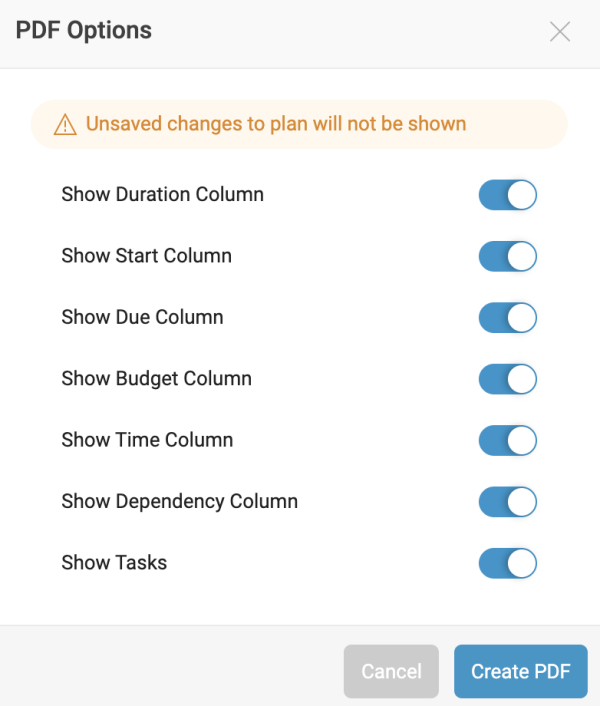
The file will be generated and available from the Projects Attachments tab. Learn more about Attachments.
Pause a Project
Every Project Plan won't be executed perfectly. Maybe a new Project suddenly took priority, causing team members and resources to be pulled in. Or unforeseen obstacles caused the Project to be put on hold.
In order to better adapt to these sudden roadblocks, you have the ability to pause a Project.
Pausing a Project will pause all milestones and tasks in the Project Plan, meaning auto-scheduled and committed time for that task or milestone will be cleared from the assignee's schedule (plus any other users who had time committed to that task). The time remaining on the task won't be removed though - just hidden away until the task is resumed.
Before you can begin pausing Projects, though, an Admin must first set up the pause feature as a Special Process Action on the Project Type.
To set up this Special Process Action:
-
Click on the Settings gear at the bottom left-hand corner of the screen.

-
Next, click on the Projects tab, then click the Types, Progressions & Fields option. If you have a Project Type already created, then select it from the list at the bottom of the tab. Otherwise, click the + Add Project Type button.

-
For the Project Type, we'll want to create a new Status for Paused (if it currently doesn't exist).
-
Click the New Status button.

-
In the modal that appears, title the Status as Paused, give it a Paused standing, then assign a color.

-
Click Create.
-
-
Now, you'll want to create a new Status Progression. Click the + New Progression button to begin.

-
Give the Progression a title (EX: "Paused"), an icon, and choose the From and To Statuses for the Progression. When completed, hit Save.
-
For the From status, select the Any option. For the To status, select Paused (or given name for Paused status you created earlier).

-
-
Now that our Progression is created, we want to add a Special Process Action to it. On the Progression, click the + sign and choose the Special Process option.

-
In the Field dropdown, select Pause all incomplete Milestones and Tasks and click Save.

-
Pause all incomplete Milestones and Tasks: This will pause all the work within the project which isn't already completed or inactive. Any committed or auto-schedule time for the tasks will become hidden from your users' schedules. Scheduled activities (meetings) will not be changed.
-
-
Now, we'll create a Progression for resuming the Project.
-
Again, click the + New Progression button.
-
Give the Progression a title (EX: "Resume"), an icon and choose the From and To Statuses for the Progression.
-
For the From status, select the Paused Status. For the To status, select the Active Status.
-
-
Once the Progression is created, click the + sign on the Progression, then select the Special Process option.
-
In the Field dropdown, select Resume all paused Milestones and Tasks.
-
Resume all paused Milestones and Tasks: This will unpause all the work (which isn't already completed or inactive), returning milestones & tasks to their previous status. The estimated time left on tasks will then be returned to users' schedules as auto-scheduled time.
-
-