The content in this guide is currently being revised to align with the new user interface. Some text and images may be outdated.
Navigating Accelo
Logging into Accelo for the first time can be intimidating. Considering the versatility of the application, there are a number of buttons, icons and features available at your disposal.
So to make your first login less daunting, let's walk through a couple of the main pieces you'll need to know about when using Accelo.
Accelo has two main components you can find on each page:
-
The Navigation bar is always accessible across the top of your Account.
-
The Product bar can be found on the left side of your screen.
The Navigation bar is made up tools you need to complete your work on a daily basis:

-
Product List: Lists all of the different products in Accelo. Clicking on a Product name will take you to a List View of the work across that module, allowing you to segment, track, and filter your ongoing and completed work easily.
-
Search Bar: Search for any object within Accelo by name, or select the type of object from the drop-down arrow for a more narrow search.
-
Create button: Create new work from scratch. Choose between Activity, Task, Project, Sale, etc. from the drop-down list.
-
Time button: View your daily or weekly Timesheets to see assigned tasks and work logged by day, or easily open your list of ongoing Timers.
- Task button: View your assigned Tasks in different Task Boards, tracking your work by Deadline, Status, or Assignment.
-
Schedule button: View your Scheduled work on My Schedule, access our Team Scheduling resource allocation tool, or view the Schedule Dashboard.
- Inbox button: View your personal Inbox of any correspondence you have received from clients, or view the Request Inboxes for shared team correspondence.
-
User Profile Icon: Click on the circle showing your picture or Initials in the top right corner of Accelo to see your Notifications and Account Preferences and how to setup your Integrations.
The Product Button
The Product button at the top left-hand corner of your Accelo deployment is where you'll click to access all of the modules you'll need to run through your day-to-day activities.
Let's run through some of the key pieces of this section of Accelo:
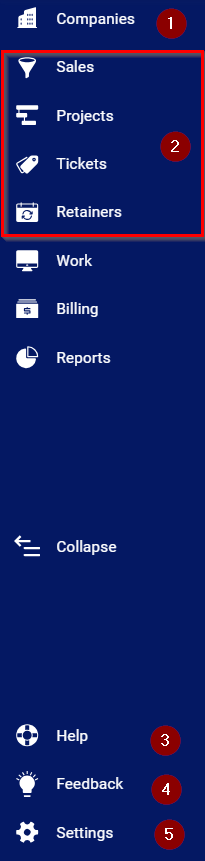 Product Bar: Click on the Product bar on the left-side of your Accelo deployment to expand your Products list. Your Products can always be accessed via the icons on the left-hand side of the screen, but expanding the list will allow you to see the actual Product titles.
-
CRM Product: Companies is where you can add companies or clients to track in your deployment. Whenever you create new work in your account, whether it be a project, sale, ticket/issue, retainer, task, or any logged activity, you will be asked to create it against a singular company. Once you create projects, sales, issues, activities, etc. against a company, all ongoing work will be logged directly on their Company Page. On each Company Page you will see real time updates of all data logged against the company. Contacts: Using Contacts, you can keep track of all the contacts associated with companies in your deployment. By clicking a contact's name, you'll be directed to a View Contact screen, where you can access and edit your contact, update contact details, quickly find any related work, search through ongoing messages, and reference all team correspondence in one convenient location.
- Primary Products: Depending on your Accelo plan, you may have one or multiple of the following products:
-
Sales: Stay on top of deals and win more sales by having all of your notes, appointments, emails, attachments & custom fields at your fingertips.
-
Projects: Go beyond simple planning and collaboration with Accelo’s Projects Module. Manage your projects against budgets and resources in real time, get instant visibility into team schedules, quickly and smoothly make edits to project plans, and connect your shared client database to manage projects and schedules in one place.
-
Tickets: Deliver consistent, streamlined and profitable client service, easily. By allowing tickets to be converted from emails, custom organization, automating tasks, and keeping everything in one place, Accelo lets the ticketing process work around your business.
-
Retainers: Retainers are used for any products or services you provide to your clients on an ongoing or recurring basis. Manage the ongoing and recurring work you do for clients, including tasks and billing, in one easy-to-use place to boost revenue, capture lost billings, and help cut administrative headaches.
-
- Help: Access to help guides and a form to submit questions to the support team.
- Feedback: Access our Ideas Forum and Accelo Community for greater support options.
-
Settings gear: Access your deployment configuration, individual module settings, client portal settings and more by clicking on the Configuration gear.
User Profile Icon
Your User Profile icon is where you'll find several items related to your Accelo account itself, including Notifications, Account Settings, Preferences, Integrations, etc.
![]()
- Account: Clicking the Account tab will direct you to your specific user page in Accelo, where you can view your account's information, activity, schedule, daily timesheet and more.
- Preferences: Accelo offers many settings which can be changed by each user to customize their experience. Click on the Preferences tab to change items such as your Default Screen Settings, Vacation Calendar, Notification Settings, Two Factor Authentication and more.
- Notifications: Clicking on the Notifications tab will show all of your email notifications for your account. To configure email notifications in Accelo, check out our detailed Help Guide.
- My Activity Dashboard: Jump to the Activity Dashboard for a summarized view of what you're working on as it relates to client communication.
-
My Work Dashboard: Jump to the Work Dashboard for a summarized view of what you're working on as it relates to work objects such as your managed Tickets, Companies, Projects, etc..
-
Integrations: Clicking on the Integrations tab will direct you to the third-party services that can be integrated with your Accelo deployment. Check out our Integrations guide to see how you can start pairing your account with other services today!
- Mobile App: The Mobile App page allows you to download the mobile app, as well as scan a QR code to login.
- Log Out: Force Log Out of your current session. You will be automatically logged out after a period of inactivity.