The content in this guide is currently being revised to align with the new user interface. Some text and images may be outdated.
Try it Yourself: Add a Budget
Keep a budget tracked on your Tickets for a real-time cost comparison of the time and money tallied as staff do their work, seeing how much time and money you are spending on individual clients, and allowing you to have higher-level discussions on where you can best allocate your resources.
Using this guide, you can:
Ticket Budget
Having a budget on a Ticket is optional. They are useful for quoting ad-hoc services, or small quoted sets of work. A user may be able to set the budget and rate when creating the Ticket, but you can always add/edit the budget afterward as well.
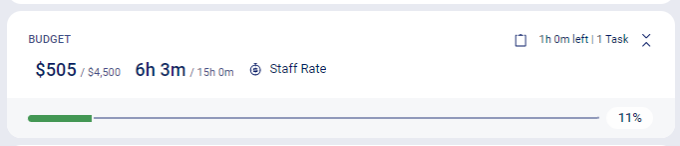
View the Budget: You can view the Budget from the default Overview tab. The Budget section contains the Current Value/Budgeted Value, Current Time/Budgeted Time, Rate, Number of Tasks and Remaining Task Time, and a Progress Bar with current Value percentage.
- Click the 3 Dot Button from the menu at the top right side of the Ticket View page. In the dropdown menu, select Edit Budget.
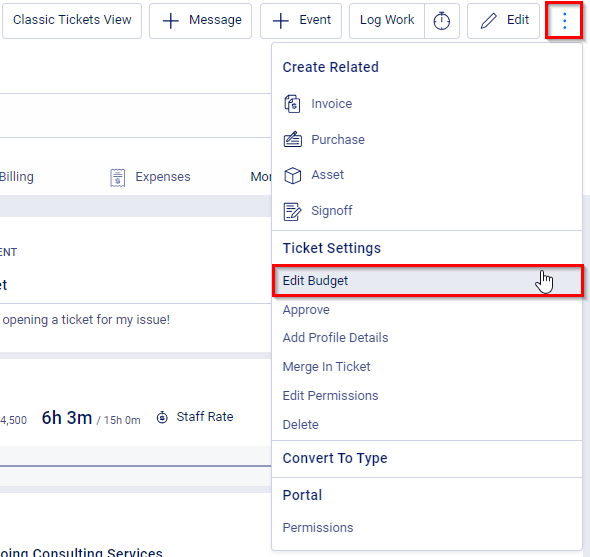
- A window will pop up, where you can set the Ticket Budget and all the details you can configure.

- Configure the type of budget you want for our Ticket. You have three main options and the amount of time you wish to allocate for the budget.

- Search for and select the Service Type if necessary, from your saved Service Items. This will allow you to keep track of the Services you are providing, for your personal records. This will not affect the Budget price but will apply the default ledger & tax codes on the Services to the work you are logging. Also, define your hourly rate (this option will not appear if you chose to have a Non-Billable budget).

- Use staff rate: Apply the rates of the individual users/staff working on this Ticket. Set up rates.
- Defined rate: Choose a set rate from the drop-down list, which you can also choose to override if necessary. - Add any Materials to the Ticket Budget. These can be inputted from your saved list of Materials, or can be entered as needed for each Ticket.

Click "Add New Materials" to add a new Material. You can list as many Materials as required. Click the Save button when you have entered the details of the Material to save it.
Click Next to learn how to Log your Time.
Signoffs for Scope of work Extensions
Any time you need to do work for a client that is outside of your normal scope of work or what you originally agreed upon, you may want to create a Signoff to have your client or coworkers approve this work. Clients can track these types of extension requests directly within their Client Portals, so they can make comments, add attachments and approve work.
Learn more about Creating Signoffs.
Log your Time
Log your time as you work on a Ticket in order to ensure that billing is accurate. At any time, Add a Message, Event, Log Work, or start a Timer against the Ticket with the click of a button. All work and time logged against a Ticket will be defaulted to Billable unless noted otherwise.
Click + Message, + Event, or Log Work from the top right to start a new activity. Learn more about Adding an Activity.

To log time against a specific Task:
Select the Tasks tab, click on the three dots next to the Task you want to add time to then choose from Create Message, Log Work, or Start Timer depending on your needs.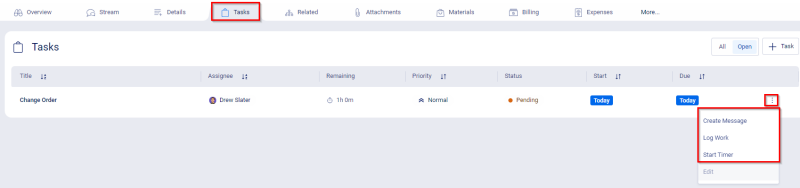
You can mark a message/Work Log as either billable or non-billable, buy toggling the below icon next to the time input.
- Billable:
- Non-Billable:

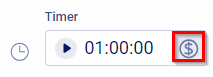
Note: If you have started the timer you will be able to make this time Non-billable after Completing it.
Click Next to learn how to Progress your Tickets.
Desktop & Mobile App Timers
Use Timers on the go with either our Web or Mobile Application.
Web Application: Using timers in the Web Application is easy and convenient. Learn more here.
Mobile App & Apple Watch Timers: Use your phone to create, start and pause timers in the Mobile App, and watch them sync with the Web App like magic. Download here.
Progress your Tickets
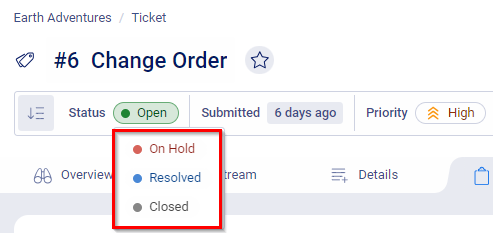
Your Status & Progressions for the Ticket are located at the top of the Ticket Overview. These operations are dependent on the progression that is configured for each Ticket type you use.
To change the Status of a Ticket, click on the current Status and choose the new Status from the drop-down options.
Some Status changes may require you to provide more information or prompt you to complete certain actions. You may also be prompted to approve the activities against the Ticket, ensuring that any time spent on the Ticket has been reviewed and then appropriately allocated to an invoice.
Learn how to configure your Status & Progressions.
Click Next to learn how to Approve work on Tickets.
Triggers
Take the hassle out of keeping track of your work, your time and your client relationships with Triggers. Harness the power of knowing what's going on with client work, and then take action automatically with your Triggers & Notifications.
Automatically escalate a request or ticket - automate sending reminder emails, changing status, or changing ticket priority - if the ticket is over a certain age or hasn't had any work done on it yet. Triggers allow you to configure rules which trigger business processes automatically - whether it is sending an email reminder, updating the status of your work, or escalating a request to a ticket.
Approving Work logged in Tickets
Approving work is vital for managers. Accelo aggregates all logged billable and non-billable work into our Approve Work tool, allowing you to review all activities and time recorded against a Ticket, and ensure that any billable time is handled appropriately.
Using this guide, you can:
Approve Work on your Ticket
Confirm that all work completed against a Ticket is accurate before approving it, in order to ensure that you bill your clients accurately.
The billing amount shown for each activity is based on the current rate. You can edit the budget options for the Ticket to change the rate, which will update the billable amounts for any activities with time on them.
You may automatically go to the Approve Work page if you progress the Ticket Status, such as from Open to Resolved. Learn more about Status & Progressions.
To get to the Approval screen:
- Click the 3 Dot Button from the menu at the top right side of the Ticket View page. In the dropdown menu, select Approve.

- You will be taken to a new page where you can review and approve the work completed on the Ticket before invoicing.
Edit time or amount
You are able to edit the amount of time on each activity line. Click the arrow on each line to open a list of logged activities below. Click on the number of each type of activity to see all of the activities.

Simply click the hh:mm:ss value on the appropriate column to enter more billable or non-billable time.

Change the logged time from billable to non-billable by clicking on the arrow that appears beside the logged time.

The amount shown for each activity is based on the current rate. Edit the budget options for the Ticket to change the rate, which will in turn update the billable amounts for any activities with time on them.
Edit the rate for a single line item by clicking on the rate value and entering the new rate.

View and edit all activity details, as well as approve the work by clicking on the edit button next to each line item.
Edit the billable and non-billable time, as well as the rate, and then check the box next to Approve time? to approve the work.
Approving Activities using Drag & Drop
Ticket activities can be marked approved by clicking on the drag & drop icon (the nine-dot-squares) located on each entry's row, and dragging the activity under Approved Activities. Alternatively, if you have already invoiced for this particular entry, you can always drag and drop under Invoiced.

Approving all activities within a period, quickly and easily
The Approval screen makes it easy to Approve time entries with the click of a single button. If the time entries meet with your Approval, click the Approve button at the top of the Ticket to Approve all of the entries. 