The content in this guide is currently being revised to align with the new user interface. Some text and images may be outdated.
Custom Profile Fields
Track key customer data to make reporting easier and do away with those pesky spreadsheets for tracking lots of details on sales, projects, tickets and retainers. Shape your sales database in Accelo to match just what your business needs using our custom profile fields.
Using this guide, you can:
What is a Custom Profile Field?
Custom Profile Fields are customizable fields you can use to track anything that Accelo doesn't track already. Your Accelo account includes several default Profile Fields under the Company and Contact modules. If you have additional items you wish to track, you have the option of easily creating Custom Profile Fields.
Should I use a Custom Profile Field or a Custom Field?
Custom Profile Fields can be made available across many Module types, ie - Sales Types, Project Types, Ticket Types, etc. Profile Fields allow you to configure customized fields which apply to all modules for that Client.
So, for instance, if you have information you wish to populate across all modules such as certain services being offered, or client business hours, you would use the Custom Profile Fields feature.
Alternatively, Custom Fields only apply to one type of project, sale, ticket, or retainer. If you have a custom field for a Sale, you would not be able to see that field if you were working on a Project.
So, for instance, if you have a field which only needs to be recorded during a *certain* Sales Process, you should use the custom fields feature.
Configuring your Custom Profile Fields
If the standard fields don't cover all your needs, you can create your own custom profile fields.
To create a Custom Profile Field:
-
Click the Module Button, and choose Configuration.
-
Click the Module title that you want to create the Custom Profile for. For example, to create a Clients & Contacts Profile field go to Clients & Contacts and select Custom Profile Fields.
-
Click the Add Profile button.
-
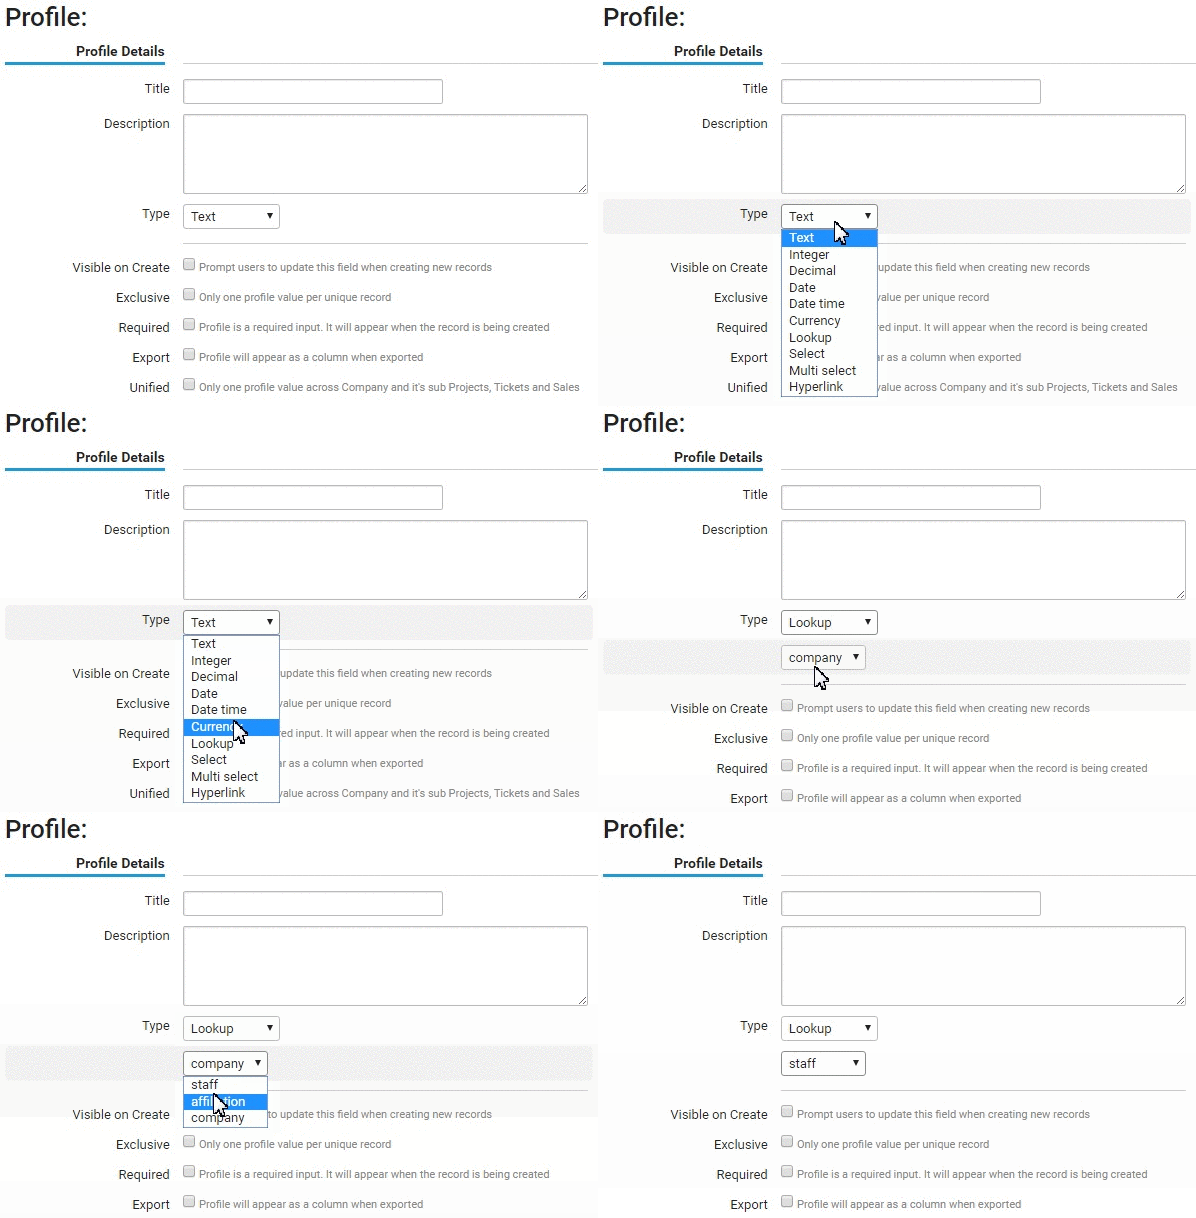
Your options when creating a Custom Profile Field:

-
Title - Name your Custom Profile fields, such as CID/Company ID.
-
Enter a Description - Describe for your team the nature of this field.
-
Choose the Type - The most popular option is Text field, since this field is a combination of number and letters. If you need a dropdown menu of options, you might choose the Select or Multi-Select type. Your options include Text, Integer, Decimal, Date, Date Time, Currency, Lookup, Select, Multi select, Hyperlink. Remember to separate multiple options by a comma.
-
Visible on Create - This profile field will be prompted every time a new record is created. This field is automatically filled in if Required is checked.
-
Exclusive - This profile field can only be added once per client. (NOTE: A Custom Profile Field needs to be Exclusive before it can be set as a merge field.)
-
Required - This profile field must be filled in when a client is created.
-
Export - This profile field will be included in a company export excel sheet.
-
Unified - Any field you want to appear across all Modules for your Clients. A change to this field will be updated across all modules. This means that if you change the value in a Project then it will update in the Client as well.
-
Apply Profile Fields to the following objects - If you do not choose Unified, then you can choose which records this field belongs to, such as Staff, Client, Invoice, etc.
-
Parent - Choose if this field depends on another one, then associate a parent field.
-
Editable by - Set the permission level required to change this field on a client record. The default is to allow all.
-
-
Press Save.
Entering this field for a record is very simple:
-
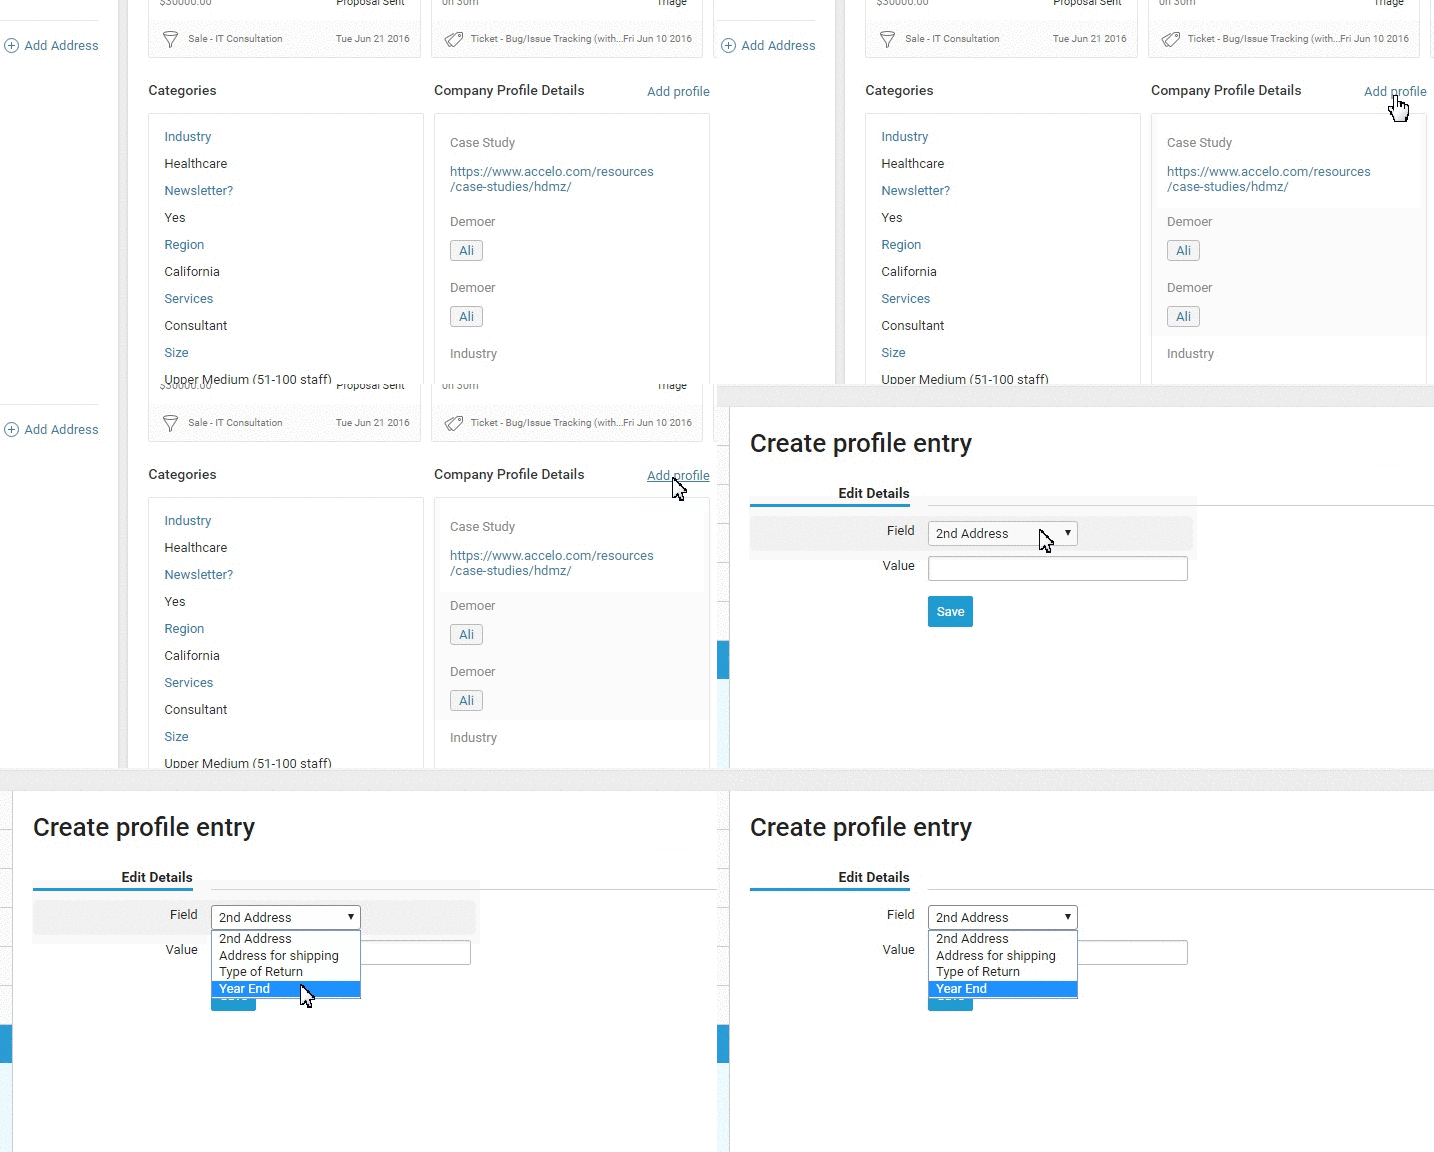
Head to the Clients module and select the company that you wish to add the profile to.
-
Scroll down the Company page to the Company Profile Details section and select the Add Profile link. This will allow you to select from the profiles you have created whilst on the Admin page.
- Your profile field is now displayed under the Details tab for a company, as in the below image.
Note - Custom Profile Fields added to other record types will typically appear in a similar Details tab within the View screen - e.g., View Ticket or View Sale.
If you wanted your profile to appear on the creation of a contact, make sure Required and Exclusive are selected. This will allow you to have it required for the creation of a new contact and ensure that is only created once per contact.
Advanced Lookup Relationships
Lookup profiles are a great way of creating relationships between different records.
For example, say you have a company called Starbucks HQ that has child companies located around the world, like New York, London, Sydney, etc. If you want these relationships to be reflected in your Accelo account, you could create a new Lookup profile field called Parent Company and define it to link up to other Client records.
As you enter each individual Starbucks location, by editing the Parent Company field to equal “Starbucks HQ” you have distinct client records with a clear picture of how they are all related.
NOTE: Lookup fields can not be used as merge fields.
To add a Lookup relationship:
-
Follow the previous steps to add a Custom Profile Field.
-
Change the Type to Lookup from the drop down menu.

-
Select an option from the second drop down menu depending on what relationship you are creating. For this example we've chosen Staff. However, you can also create a lookup for company and affiliations.
