The content in this guide is currently being revised to align with the new user interface. Some text and images may be outdated.
Work Days & Holidays
Choose how your work week is configured and scheduled easily through your admin or personal settings. Enter vacation dates for when you plan to be out of the office. Ensure that you are not scheduled for work you are unable to do because of scheduling conflicts.
Admin users can edit the default work week for the entire office, as well as schedule company holidays.
Using this guide you can:
- Edit your company's work week
- Edit your company's scheduled holidays
- Edit your personal work week and vacation days
- For managers, edit your team's PTO/sick days
- Edit Group Holiday Calendars
- Create an Event for a Group
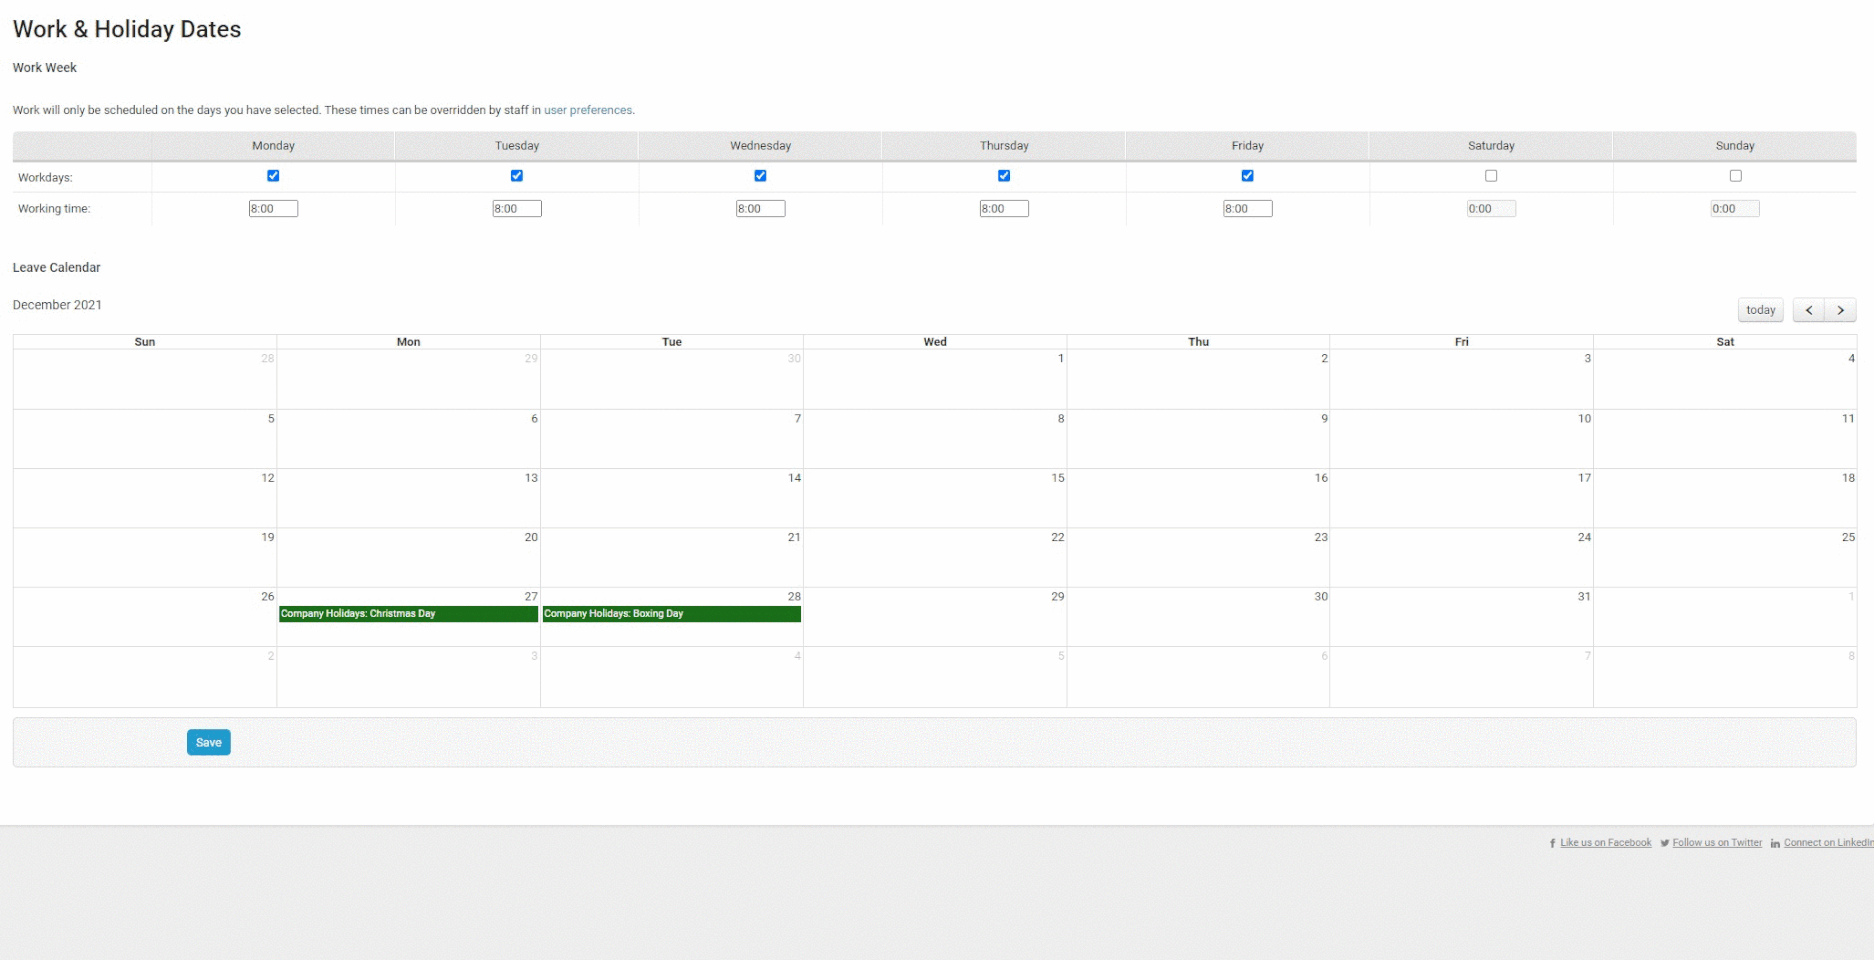
Edit Company Work Week
Edit the default work week for your entire company as an Admin user.
To edit your company’s work week:
-
Navigate to Settings by clicking the Left Hand Side Menu and selecting Settings

-
Under General Config, select Work & Holiday Dates.

-
Check the box for each day your company normally works, and enter the number of hours in a given work day.

-
Click Save at the bottom of the page to save these settings.
Edit Scheduled Holidays
Edit your company's scheduled holidays to ensure that everyone is on the same page and is not scheduled to work on days they will be on vacation. Your scheduled holidays are determined by your Calendar Profile.
To edit your company’s scheduled holidays:
-
-
To add a Holiday or Vacation, click on the starting date on the calendar and enter the time & dates, and name of the vacation time.
-
A user can select to create a User, Group, or Company Holiday.
-
A different color will be used on the calendar overview for each type of event.
User events will display in Blue
Group events will display in Orange
Group National or Regional Holidays will show in Green
Company events will display in Black
Company National or Regional Holidays will show in Green -
Click Create Event to save.

-
It's also possible to edit and remove any event or holiday, to do so click the event or holiday to open up a detailed view. From here you can make any edits or Remove event. When making edits please remember to click Update Event.

Please note the “National or Regional Holiday” option is only available for Groups with a Calendar Profile set, or for Companies.
Edit Personal Work Week and Vacation
Individual users can edit their work week and vacation days in their personal user settings as well.
To edit your personal work week & vacation days:
-
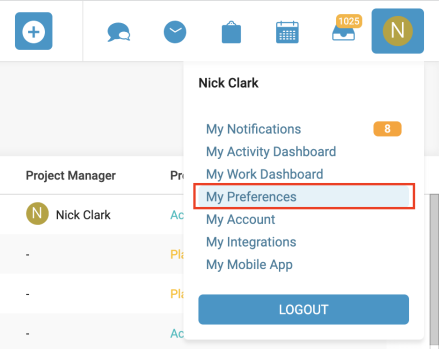
Hover over your User icon in the upper right corner of Accelo and select Preferences.
-
Click Expand next to Work Week and Vacation Calendar.

-
Edit your settings as above.
-
Click Save at the bottom of the page to save these changes.
For Managers, edit your team's PTO/sick days
In your Accelo deployment, you may run into situations where your company has set Managers who overlook specific teams of users, and those Managers are in charge of reviewing, adding, updating and removing those teams' PTO, sick days, etc.
For Admin users who manage other users, this can be done through the company-wide Leave Calendar.
For Managers who are Professional Users in Accelo, though, there are some additional steps needed in order to be granted access to the company-wide Leave Calendar:
-
As an Admin, navigate to that Manager's user profile in Accelo.
-
Next, click the Edit button, followed by Edit Permissions.

-
Next, scroll to the bottom of the User Permissions screen, then under the Admin section, select the Edit All Work & Holiday Dates option.

-
This Manager will now have access to the company-wide Leave Calendar, which can be found by clicking on the Configuration gear, General Config, then Work & Holiday Dates.

Edit Group Holiday Calendars
Maybe your organization has multiple offices spanning across the globe - your developers are in Australia, your marketing team is in Great Britain, and your sales team is based in the United States. With those different locations comes different country holidays. Your Australian users, for example, won't have the Fourth of July on their holiday calendar, but they need to be aware that their American coworkers will be out of the office.
Instead of individually adjusting every user's calendar to reflect their respective holidays, utilize Groups to set specific calendar profiles for subsets of users.
To set a calendar profile for a Group:
-
Click on the Settings gear at the bottom left corner of the screen.
-
On the left side of the screen, navigate to the Users & Groups section, then click on Groups.

-
Choose the Group you wish to set a specific calendar profile for from the Groups list.
-
In the Calendar Profile section, click the dropdown to select the calendar profile for the group.

-
Click Save.
Create an Event for a Group
Have a marketing team-only event coming up? Maybe a get together for the development staff? Create Events for specific groups by utilizing the quick create feature on the Leave Calendar.
To create an Event for a Group:
-
Click on the Settings gear at the bottom left-hand corner of the screen.
-
Under the General Config section, select the Work & Holiday Dates tab.

-
On the Leave Calendar, select the date of the Event. A modal window will appear.
-
In the modal window under the Create event for field, click the dropdown arrow and select Group. Next, choose the group you wish to create the Event for.

-
After giving the Event a title, date range and duration, click the Create Event button.