The content in this guide is currently being revised to align with the new user interface. Some text and images may be outdated.
Account Managers & Private Relationships
Keep track of which staff are responsible for which clients with Accelo’s Relationships feature. Your Relationship status allows you to keep track of your clients, receive notifications of actions taken on their account, stay copied on your team's correspondence with important clients, and set your client conversations to private.
Using this guide, you can:
Account Managers on Company Accounts
Easily mark a user an Account Manager for a Company on your account, and give them the opportunity to stay up to date on all logged activities and correspondence with the company contacts. When you are assigned as an Account Manager, you can be automatically CC'd on a range of interactions with that company.
When viewing a Client, you can see the staff who are configured as Account Managers under the Client Details section in the left column.

Managing Account Managers
To Add an Account Manager:
-
From the View Company page, find the Client Details section in the left column.
-
Account Managers have a manager relationship. By default, the company will have one manager. However, you can also add additional managers or remove all managers, so that the company has No Manager.
-
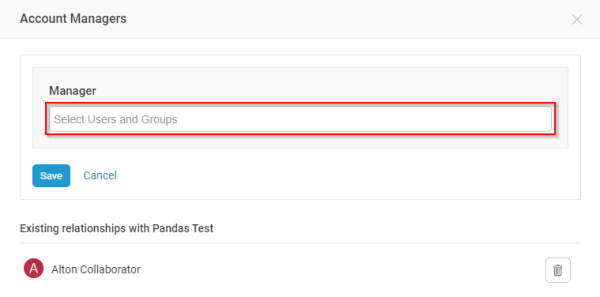
To add additional managers, click the + icon next to Account Managers. A dialogue screen will open, allowing you to search users to add.
To delete Account Managers:
-
To delete any of the Account Managers, click on their name.
-
A list will appear with a trash can icon next to their names. Clicking on the this icon will delete them as an Account Manager.
Once assigned as an Account Manager, you can easily update your User Notifications to be CC’d on a range of activities in Accelo.
To update your User Notifications:
-
Click your User Profile Icon and select Preferences. Scroll down on this page to view your Notification Settings.
-
Under Notification Settings, find the line marked When you manage the client the object is against.
-
Use the On/Off buttons to update your preferences and then click Save from the bottom to confirm

Private Relationships
There are other types of relationships which can be established with a company, each of which have their own rules and functionality within Accelo.
A. Confidential Relationship
Create a Confidential group relationship to keep communication with a client confidential to other users outside of the defined user group. This relationship ensures that anyone outside the confidential user group will not be able to see any of their shared client communication. Of course, if an email is received by a staff member who is in multiple groups, then the activity that is created will be visible to all of the members across those groups.
Create a Confidential individual relationship with a company so that all communication between contacts at that company and the individual are marked as confidential - meaning other users can see the email/call took place, but they can't view the contents.
An additional feature of the confidential privacy setting is when it is coupled with Confidential Profile Fields. These are custom fields on a company or contact record which have been configured as confidential. The user accessing this company/contact record must have a confidential relationship with the company/contact to have visibility of these fields.
B. Secret Relationship
A secret relationship means that the relationship with this contact/company is completely private. Any communication between you and this contact will be completely hidden from view for all other users. This setting is ideal when you frequently interact with a contact on non-business matters and would by default like the activities to be completely hidden to everyone else. You can individually remove the private flag from an activity if it happens to be business related.
While you may be able to edit the relationship level between other staff members and a company, you can’t modify their relationship level with individual contacts.
All managers of the object will be excluded from any relationships that are created from within the specific object. For instance, if Joe manages a Sale, then the confidential relationship that staff has with contacts will automatically include Joe - displaying the contents of the activity. This will only happen with activities created from that sale.
Managing Relationship Privacy
Managing Client Privacy can be achieved in the same locations as your Account Managers, under the Client Details. Please keep in mind that changes to relationships regarding Privacy do not apply retroactively to any activities. They will only affect activities moving forward.
To add a Relationship:
-
Click on the + icon next to Privacy.

-
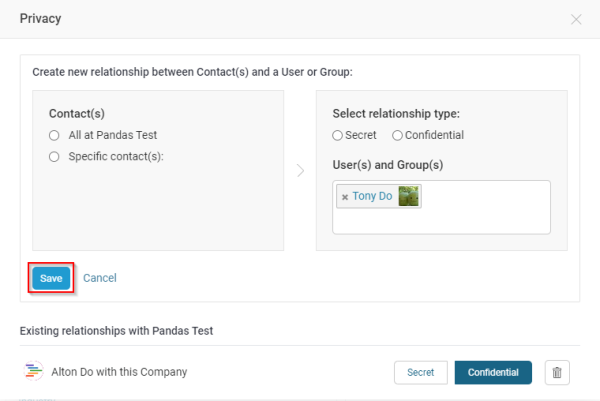
A pop-up window will appear. Here you can select:
All Client Contacts - You want ALL Contacts for the Client to be under a Relationship setting.
Specific Contacts - You want only particular contacts under the Client for this Relationship -
After choosing your Contacts, you would then select your User(s) or Group(s) in the Relationship.
-
Select your Relationship Type:
Confidential - Allow users outside the relationship to see an activity occurred, but no details within the activity.
Secret - Allow users outside the relationship no visibility of the activity. -
Hit Save to complete the Relationship.

To delete a Relationship:
-
Click on a member in a Private Relationship.
-
If they are in a Secret Relationship, change them to a Confidential Relationship. Note - we require the extra step from Secret Relationships to Confidential to delete because Secret Relationships tend to be highly confidential or sensitive.
-
There will be an trash can icon next to their name in the pop up window to delete.
