The content in this guide is currently being revised to align with the new user interface. Some text and images may be outdated.
Set Up Triggers & Notifications
Do great work for your clients, and take the hassle out of keeping track of your work, your time and your client relationships with incredible automation around capturing key information about your work. Harness the power of knowing what's going on with client work, and then take action automatically with your Triggers & Notifications.
Examples include:
-
Notify a sales manager if a salesperson hasn't communicated with their client in more than X days.
-
Automatically escalate a Ticket by sending email notifications, changing its status or priority if it has not been responded to.
-
Automatically convert a Request into a Sale or a Ticket if it contains the word "urgent".
- Notify your client if they've exceeded their Retainer's monthly allowance.
-
... and so many more options.
Using this guide, you can:
Your Triggers & Notifications Tool
Triggers allow you to configure Rules which triggers business processes automatically - whether it is sending an email reminder, updating the status of your work, or escalating a request to a ticket. The rules can include things like the client’s status, subject/body text matching (like “URGENT”), new emails being received, and time delays between other key steps (like the time a Ticket was created, for example).
Fine-Grained Frequency Control
Accelo's Triggers are your business’ autopilot. Once you've created them, your Triggers will run in the automatically in the background, monitoring your ongoing work and taking action when its Rules are met. One of the most important Rules which you'll be configuring in your Triggers is its Frequency. The Frequency controls the days and times of day which the Trigger runs on, and whether the Trigger is restricted to running only once for each Sale, Project etc. which matches the Trigger's Rules, or every time which the Sale, Project, etc. matches the Trigger's Rules.
 Read more on setting your Triggers' Frequency
Flexible and Powerful Rules
Accelo tracks everything that happens in your business - and with that data, you can take action, automatically. Trigger rules let you narrowly define when a trigger will fire, keeping you in control.
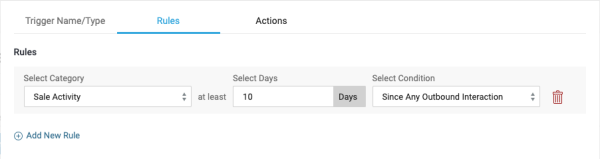
Above you can see a Trigger Rule highlighting the "Days Since Outbound Interaction". This Rule checks whether someone on your team has contacted the client, specifically looking for sales opportunities where the client hasn't been contacted for more than ten days - if your team are dropping the ball, you'll want to take action!
Read more about configuring Trigger Rules.
Actions to Keep Your Business Running
Let your business run itself. You can create tasks, update fields, send emails, or even update statuses automatically using Trigger Actions.
- Create Tasks: Assign a task to a sales manager to follow-up with a client who hasn’t been talked to in 10 days.
- Send emails and other activities: Automate email notifications to your support manager to let them know an urgent ticket hasn’t been updated in a week.
- Change fields and statuses: Automatically convert email requests that come in with the word ‘urgent’ into high priority issues.
Read more about the different Actions, and how they're configured.
Creating a Trigger
If you haven't already done so, be sure to customizes your Status & Progressions for your Modules, as they're a key part of how Triggers and their Rules are configured. After you're customized your business processes, you're ready to begin creating Triggers.
To create a trigger:
-
You can create a Trigger by navigating to the Types, Progressions & Fields page of the module (Sales, Projects, etc.) which you'd like to automate, and clicking the Triggers tab. This is the same page which you'd use to set up your Statuses & Progressions.

-
From there, click on the blue +New Trigger button, and you're ready to begin configuring your Trigger.

-
Set the Trigger's Frequency to control how often the Trigger is run.
-
Set the Trigger Rules to control exactly when the Trigger's automation should occur.
-
Set the Trigger Actions to control the actions which the Trigger should take.
-
Click Save to save your changes, and be sure to turn the Trigger on to start the Trigger's monitoring.