The content in this guide is currently being revised to align with the new user interface. Some text and images may be outdated.
Client Invoicing
Sometimes you may need to bill a client who does not have work such as Projects, Tickets, or Retainers to be billed for. In these cases, you can create an invoice directly from a Company page, and bill them for individual line items.
Using this guide, you can:
- Add an Invoice against a Client
- Format the settings of the Invoice
- Create the Invoice
- Preview & Edit the Invoice PDF
- Review & Manage your Client's Invoices
Adding an Invoice against a Client
On the Company View page, click the Add button and select Create Invoice.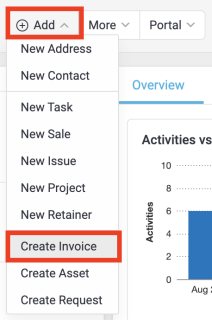
This will create a new blank invoice against the client. Note that you will need to enter each line item manually.
Invoice Settings

- Invoice Template: Choose the template you would like to apply to this invoice.
- Invoice Title: Enter the title of this invoice.
- Owner: The staff member responsible for the Invoice.
- Bill To: The Primary contact to be billed.
- Raised Date: The date you want the Invoice to be Raised on.
- Due Date: The date the payment of the Invoice will be due.
- Customer Description/Notes: These are external notes, which your Client can see when you provide them the invoice, such as, "This Invoice is a deposit for upcoming work".
- Internal Description/Notes: These are notes for your own internal records, which the Client will not have access to, such as, "Work will not begin until this invoice is paid".
Invoicing for Services
Under the Services section, click "Add new Service line item" to itemize your invoice. You must have at least one line item to save the invoice. As you add line items, the invoice Totals (top right blue box) will update.
The line item total is calculated based on the amount and the Tax Code that you select. Note that you can't change the tax percentage from this interface.
The list of ledger codes available can also be modified by an administrator. If you have imported billing ledger codes from an online billing system then you will see these in the Ledger Code drop-down.

- Default Service Item: Choose to reflect the Service Type you are Invoicing for.
- Select / Deselect the individual items you would like to include or exclude in the Invoice by checking or unchecking the checkbox beside each object.
- Description: Edit the description of the line item.
- Hours: Edit the number of hours that were spent on this line item.
- Rate: Edit the rate at which those hours should be billed.
- Add new Service line item: Choose to add on items that were not already included.
- View Service details as well as edit Ledger & Tax codes.
Invoicing for Materials

- Select / Deselect Materials to be Invoiced by checking or unchecking the checkbox beside each Material.
- Description: Edit the description of the Material.
- Quantity: Edit the quantity of the Material used.
- Price: Edit the price of each Material.
- Add new Material line item: Choose to add on Materials that were not already included.
- View Material details as well as edit Ledger & Tax codes.
Create the Invoice
After reviewing all Details, Settings, Line items, and Expenses, review the Tax Codes and Totals. When you're finished, choose from 3 options, Preview & edit PDF, Save Invoice or Save & Send PDF which will send the Invoice to the Billing Contact right away.
Note: All three options will create an Invoice, but your choice determines which function you want to utilize.
Preview & Edit the Invoice
Preview a more detailed Invoice Report, which you can further customize before sending to your Client. Learn more about creating a PDF Invoice here.

Customize your Invoice by:
- Style: Choose Font and Color Theme for the Invoice.
- Services: Choose to show Quantity, Price per unit Tax Codes and Tax amount for Services.
- Materials: Choose to show Quantity, Price per unit Tax Codes and Tax amount for Materials.
- Expenses: Choose to show Quantity, Price per unit Tax Codes and Tax amount for Expenses.
- Payments: You may also choose to show any previous payments made as well as any related invoices that have been created.
- Activities: Choose to breakdown your logged work for the Client.
- File Name: Customize the Name of the PDF File.
- After reviewing all the details, hit Save & Close.
- Save the Invoice: This saves the Invoice but does not send it to anyone until you choose to do so at a later time.
- Save & Send Invoice: This saves as well as sends the Invoice out to the Billing Contact.
Review & Manage Invoices
To see all invoices against a specific Client, click the Invoices tab from the middle column on the View Company screen.

Click through to the invoice to see more details.