The content in this guide is currently being revised to align with the new user interface. Some text and images may be outdated.
Import Assets from CSV File
Keeping track of and updating assets and vital information in a separate repository can be cumbersome when you’re completing your client work and maintaining client details in Accelo. Our Accelo users are able to mass import their Asset lists with their core data all at once, or make a mass edit update to their existing Asset lists using the Import Assets CSV functionality.
Reviewing and Preparing your CSV File for Import
Before you import, you’ll want to check that your CSV is properly formatted and that the fields from your CSV exist in Accelo.
You may download CSV template from Settings - Import - CSV Import: Asset.

Your CSV file must contain the Asset’s Title, Type, applicable fields against the Asset Type, Company Name, and Contact First Name and Last Name fields at a minimum.
Your CSV should be limited to 1000 rows to optimize import performance. Files with more rows of data may stall out so that the import process does not complete.
Make sure your CSV is correctly formatted:
-
For any cell with multiple values, eliminate all spaces between delimiters (commas, ampersands, etc.) and values. For example, “Staff,Accounting” NOT “Staff, Accounting”
-
The Asset Type refers to the type title that is set up in Settings > Assets > Types & Custom Fields.
-
It is recommended that the Asset manager field contains the ID number of the user who will be managing the asset in Accelo (if applicable).
-
When importing into your asset fields, please maintain the correct structure of the values that will be imported
EX: Text fields will take in any values listed in the cell, Drop-down fields will only take the values already pre-defined in the field setup in Settings > Assets > Types & Custom Fields. You can find more on how to create them in Custom Fields article.
NOTE: We cannot import values into any Object Lookup fields.
Running the Import
After reviewing the format of your CSV and configuring Accelo to have fields matching your import file, it’s time to start the import.
Upload your CSV file.
From the Import & Exports section in Settings, click the Import button under CSV Import: Asset. Browse for the .csv file by clicking Upload CSV File.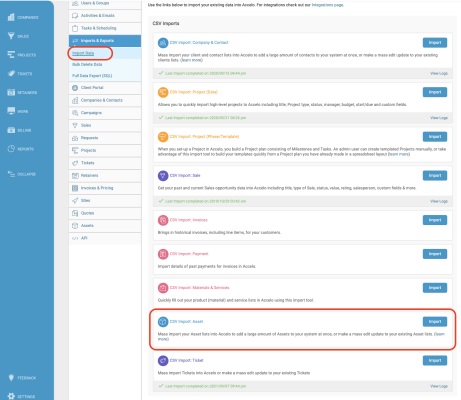 Drag column values from your CSV (on the left) to the correct space on the right.

You also have the option to Add an Additional Asset or Contact, which will just allow you to map separate fields to this area.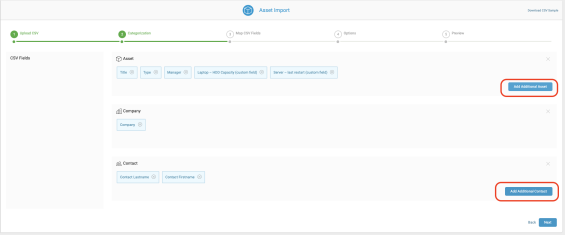
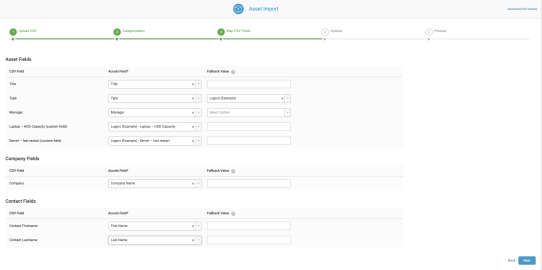
Map your CSV Fields:
Your CSV column names will be on the left, and you’ll map the import to the appropriate Accelo fields it will populate from the dropdown. Once completed, mapping the fields should look something like this:
Choose your Matching and Merge Options:
You may have already created assets into your deployment. Because of this, we offer a number of Matching & Merge Options should we find any Asset that already exists in your Accelo account and will cover these details below: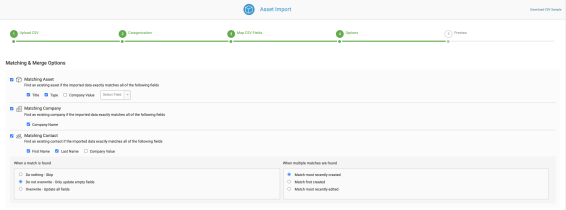
Matching Asset: Choose what Accelo looks for to find a duplicate/matching Asset. By default, we will identify it based on the Asset Title and Type, by the Company Name, and by the Contact First name and Last name values, and you can require a match to involve multiple fields from your CSV import as well.
-
When a match is found:
-
Do Nothing - Skip: We will not touch the existing match in Accelo and not import any values in the corresponding row of the CSV import.
-
Do not overwrite: Only update empty fields: We won't overwrite any existing data but will populate any blank Accelo fields with values from the import. This is the default.
-
Overwrite: Update all fields: Every mapped and matching field in the CSV import will overwrite any existing Accelo field.
-
-
When multiple matches are found:
-
Match most recently created: Match the one that has the most recent creation date within Accelo. This is the default.
-
Match first created: Match the one that has the earliest creation date within Accelo.
-
Match most recently edited: Match the one that most recently has had an edit to its key fields, such as Type or Status.
-
Certain required fields will need a Fallback value associated with them, as they cannot be left blank on the import. Please set a fallback value, even if you’ve confirmed all fields have values, before proceeding to the final step of the import process.
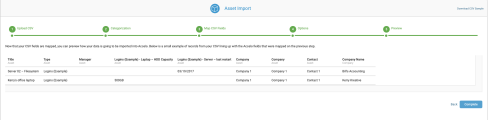
Preview your Import:
Check the Preview in Accelo to make sure it looks similar to your CSV file. The only difference is that column names are now named after the Accelo field it will be going under.
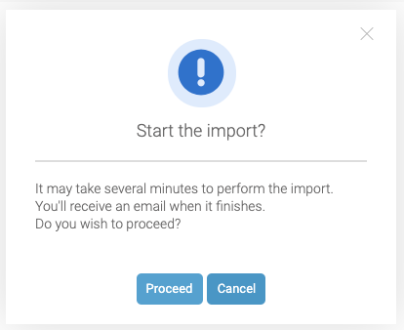
If everything looks correct, hit Complete at the bottom right, then Proceed to begin the import.
Import Results & Viewing the Log
The import process may take a few minutes depending on the depth of your CSV. During this time, you’ll find a View Logs option available where you initiated your Import.

The log will give you a very detailed breakdown on what was successfully imported, and what wasn't, and can even be expanded to show you the details and logic behind each field being mapped.

If you find you still have a lot of duplicate assets, contacts or companies in the system after importing, you can manually clean them as you discover them through merging.